Sweep and Pickup

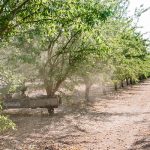
The last visual showed almonds scattered on the orchard floor left to dry – post tree shake. Moisture soon dropped below the desired 5% threshold (actual outcome 3.6 to 4.1%) and the nuts were ready for collection and transport. As these nuts are resting atop dry soil much of it loose, the standard procedure is to literally blow and sweep them into a single row. This formed row makes it possible for a pick up machine to straddle the row pile and scoop up the almond without running them over. Follows is a generic video of the blowing and sweeping action in which they tout their special berm brush to keep the dust down. I see it interfering with the drip hoses along the tree line center however. Attention: engineers in our clan! Is there a better way?

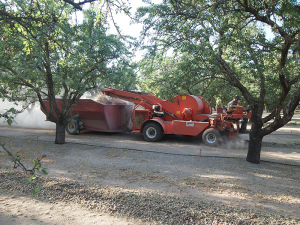
The sweeper machine blows nuts from one side of the tree berm to the open space opposite; while the main brush drives the bulk into the flat center space herding the nuts into a single row. They are retrieved by the pick up machine and carried by a cart in tow; leaving dirt and debris behind. Once the cart is full it is lifted hydraulically to dump its contents into yet another conveyance cart whose only purpose is to shuttle between the pick up machine and a semi-truck trailer awaiting roadside. In this way the pick up machine can continuously stay busy in the field.
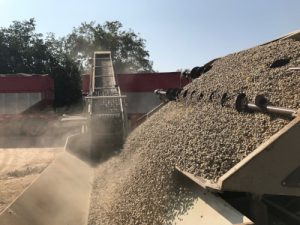
An auger and belt elevator move the almonds from the shuttle to trailer. Once these truck trailers are full they will make their way to the weigh & inspection station and huller, but more about that — next time.
Bitter / Sweet

The wine grape harvest is in full swing. Originally scheduled to begin tonight, it was pushed forward to last Sunday on the holiday weekend. This was/is the [Gallo] winemaker’s call.

Relying upon art, science, and experience the winemaker determines the mix. There is a factor of timing for processing and capacity at his winery of course, but his primary concern is the sugar content of our Muscat of Alexandria. From sour to sweetness, the longer the grapes remain on the vine the higher their sugar content.  Grapes are sampled weekly by our Gallo representative and even daily when they get close. Our rep is monitoring the sugar which is measured by Brix. We, as growers, are required to produce sweet grapes with a Brix reading of at least 18. Historically we average 21-22 but the winemaker knows what he needs and this year Brix is averaging 19.

Another measure related to harvest timing is Rot. Historically we’ve seen 0% Rot and this year is not an exception. At some point as on-the-vine sugar content peaks the grapes lose their watery content and begin to shrivel (think raisins). Mold sets in so the winery mustn’t dawdle.

A drawback to mechanical harvesting is the inclusion of leaves, sticks, stems, and other MOG (material other than grapes) with the fruit. Some machines are designed or adjusted differently so mileage may vary, but in our experience MOG of .19 to .25 percent has been typical. This year we are seeing a significant increase to .54% This counts against our tonnage yield and will need to be looked at as we do have some control over this aspect.

There have been 24 truck loads counted so far which should be about 37 percent of our harvest yield. We should have our final performance report as harvesting concludes very soon.

Marine Carburetor Labyrinth

You’d think that a brand new marine carburetor would bolt on and function perfectly out of the box but I’m finding out that you have to fuss with it. I’m focusing on the Idle circuit because turning the Idle Mixture Screws is having no effect on my less than smooth running engine.

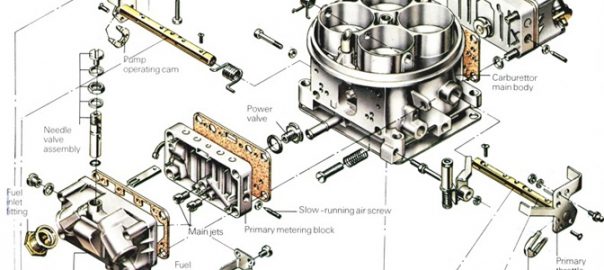
I’ve learned a few things from Randy, a good ol’ boy sharing his sense of experience on a Youtube channel. Studying the intricacies of the casting; all facets to figure the fuel trail and how it gets from here to there, I now know that there are dual routes. See if you are able to follow:

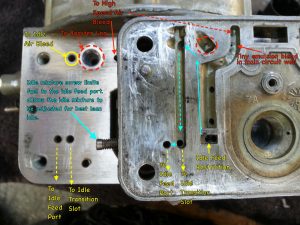
Fuel arriving from the Primary Float Bowl is flow limited by the Idle Feed Restriction (solid yellow arrow). The fuel is drawn upwards through an internal passageway (solid turquoise line arrow) to the top of a parallel downleg (dashed turquoise line arrow) to be split off to the Idle Feed Port and to the Idle Transition Slot. Small air is also  introduced via the Idle Air Bleed (solid yellow circle) to mix it up with the fuel traversing the downleg.

The dual pathway ports (dashed yellow arrow lines) deliver the the air/fuel emulsion to the Idle Feed Port and the Idle Transition Slot  in the throttle body below. The throttle body contains large butterfly valves that allow significantly more big air to mix and swirl making a combustible mixture. This [ stoichiometric ] ratio is roughly 15:1

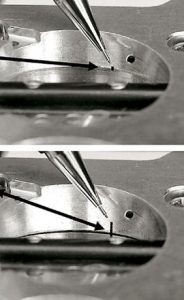
What’s happening with my application is that the throttle valves are exposing too much of the Idle Transition Slot (lower image detail). This has the undesired effect of creating an excessively fuel rich mixture.  The Idle Feed Port is not in the game passing little or no air/fuel. The Idle Transition Slot is doing it all.  Allowing the throttle to close down further will hide most of the slot (upper image detail) The Idle Feed Port (the small black dot) will resume its function with the Idle Transition Slot properly obscured. The Idle Mixture Screw can then be brought to bear allowing for precise tuning.

Final consideration: Closing down the throttle valves will by nature reduces the air volume. The engine will stall. In order to restore adequate airflow, a hole (~.080″) must be drilled into each butterfly. It will be trial test with hole size until the ideal diameter is reached. Starting small, I want to get the engine idle RPM into a ballpark range. Fine RPM adjustment can be made with the Idle Speed set screw at the throttle linkage.

That concludes the custom setup mentioned in this post intro. Idle Mixture screws will be controlling at slow idle. The Idle Transition Slot will become effective once the throttle is part open. Keyword is transition.  A fuel main circuit gradually provides even more fuel as demand calls in a seamless progression from idle to full power. Keep it smooth.

Almond Harvest Dance

Nonpareil nuts are on the orchard floor. This variety,  52% of the whole, bloomed first and harvest was begun. The Butte, Fritz, and Monterey follow in order and the process will span the remaining hot/dry season.  Our tree rows are interspersed by design and the harvester must exercise care that the  fruit varieties are not intermixed. Nonpareil is the more desireable and commands the best price category for its shape and size. Contamination with another variety (a no-no) reduces the grade to that of  mixed nuts — the lowest price.

The nuts are separated from tree by shaking. In early days this was done by laborers hand-knocking with sticks (poling), but is now mechanized due to the shear volume. The nuts in the center of the tree are the last to ripen. Moisture readings ~10% can be monitored. The nuts can be more difficult to dislodge if the hulls dry too much on tree but a test shake or two are usually the best indication that determine readiness. Optimum nut removal is 96 to 99%. Those that are left behind are not considered part of the harvest yield and become part of the orchard sanitation clean up proces$.

It’s a balancing act and a bit of a calculated race against nature as there is the eminent threat of Navel Orange Worm (NOW) and onset of early fall rain. The harvest is a significant [25%] portion of the expense budget. It is crucial that the process not begin before nut maturity but be complete before NOW pest infestation or mold issues. A too early harvest can result in excessive sticktights or curled hulls. They are a challenge mechanically and are graded as foreign matter in the delivery, a penalty.

Once on the ground the nuts must be left to dry for 1 to 2 weeks. Rain would be a detriment at this point. The machinery that process the nuts at the hulling site are impaired when nut moisture levels are too high. Almonds received in excess of 6.5% w.b.  must undergo the expense of mechanical drying. Almonds are contractually weight adjusted to a 5% ceiling. On the other hand, realise that we are paid by the pound and that moisture equals weight. Therefore 5% seems like a good target and we check the moisture statistic on the Grower Delivery Report at the end of the day.

Next: Sweeping and Pickup


Connected Home

The older style HVAC thermostat while programable was a P.I.T.A. requiring a learning curve with flashlight and small printed diagram each time. So, I bought a cloud connected unit that promised easy scheduling and operation along with simple DIY and compatibility.  All very fine until installation time that required a fifth wire between wall mounted device in the hallway and furnace upstairs. While it was trivial to connect the existing coded 4 wires I was able to sleuth an explanation online for better understanding of the meaning of the codes and how the system operates. This would prove useful.


For Reference:

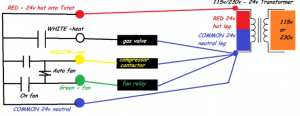
  • W – Heating (white wire)
  • R – Continuous 24 v ac Power (red wire)
  • G – Fan (green wire)
  • Y – Cooling (this wire is yellow in the diagram)
  • C – Common (this wire is blue in the diagram)
Closing R and W will initialize the heating cycle. The blower operates independently as determined by a separate furnace heat exchanger mounted temperature controller. In other words, once the heating chamber is properly warmed up the blower will come on. Similarly, when the thermostat shuts the gas valve, the blower continues to run until the furnace has cooled. Closing R and G will initialize the blower (FAN only) Closing R and Y will initialize the cooling cycle AND the blower. The schematic shows a diode (one-way) between Fan and Cooling function so that operating the Fan in manual mode doesn’t run the AC but running the AC will run the [blower] Fan.
That blue wire coded “C” in the diagram is the 5th wire mentioned for the installation. It is not used in my old tech thermostat but required to power the WiFi in the new one. Fortunately it was available as part of the existing cable bundle at the wall mounting point and quick to attach to the new thermostat.
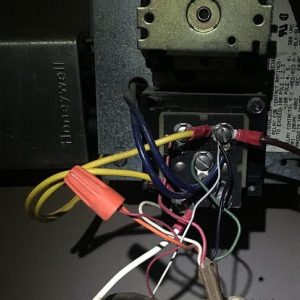
 Not so fast was connecting the other loose end of that wire in the furnace room. The example furnace in the instructional video  was modern and straightforward with printed circuit board and nicely labeled terminals. Mine looked very different and I was faced with this:
I believe the term is Spaghetti. No worries. Just tracing the wire color back to the thermostat gave understanding of the terminal to which it was connected.  Finding the “C” terminal was a process of elimination but to be certain I applied the probes of my pocket multimeter and looked for voltage and/or the absence thereof.  I hit a roadblock when the meter showed excessively high readings (60v) and on every terminal?! I was sure I was looking at a defective transformer. I spent an embarrassing length of time Googling a replacement part in between back and forths for Voltage checks and rechecks. Something was amiss.  It was a classic Red herring until I saw the error of my ways. The multimeter setting defaulted to DC and I erroneously believed that was the output I was looking for. The transformer drops the 115v AC to 24v but doesn’t convert it. i.e. the Current was still AC. 24v AC. I changed the function switch from DC to AC and suddenly everything was all good!
I completed the installation and buttoned things up. Works perfectly and I can program intuitive heating and cooling schedules to heart’s content – instruction manual not required.

Managing Expectations

The big question is how the Almond trees will perform as measured by harvest [yields] now in full swing. As you’ve been following along this crop year you will know that we endured active springtime weather that impacted trees and pollination. An objective statewide consensus believes that production will be slightly less [1%] this season.

What can WE expect? There are several variables that are givens (constants)

  • Acreage – 152.48
  • Trees – 16,166 (2016) and as per the previous post 15,491 (2017)

and some [2016] historical perspective:

  • Yield – 2,019 lbs/acre
  • Yield – 19.05 lbs/tree

We could drill down even further. Did you realize that the West block is in competition with the East Block? Soil quality, land grading, or past horticultural practices are likely culprits. The West field consistently underperforms; East Field == Winner!

2017 Best Guess for Estee Strom, LLC:

  • 19.5 lbs/tree East Field x 7,914 trees = 154,323 lbs
  • 17.3 lbs/tree West Field x 7,577 trees = 131,082 lbs

for a combined total of 285,405 lbs. or 1,872 lbs/acre…

Zooming In

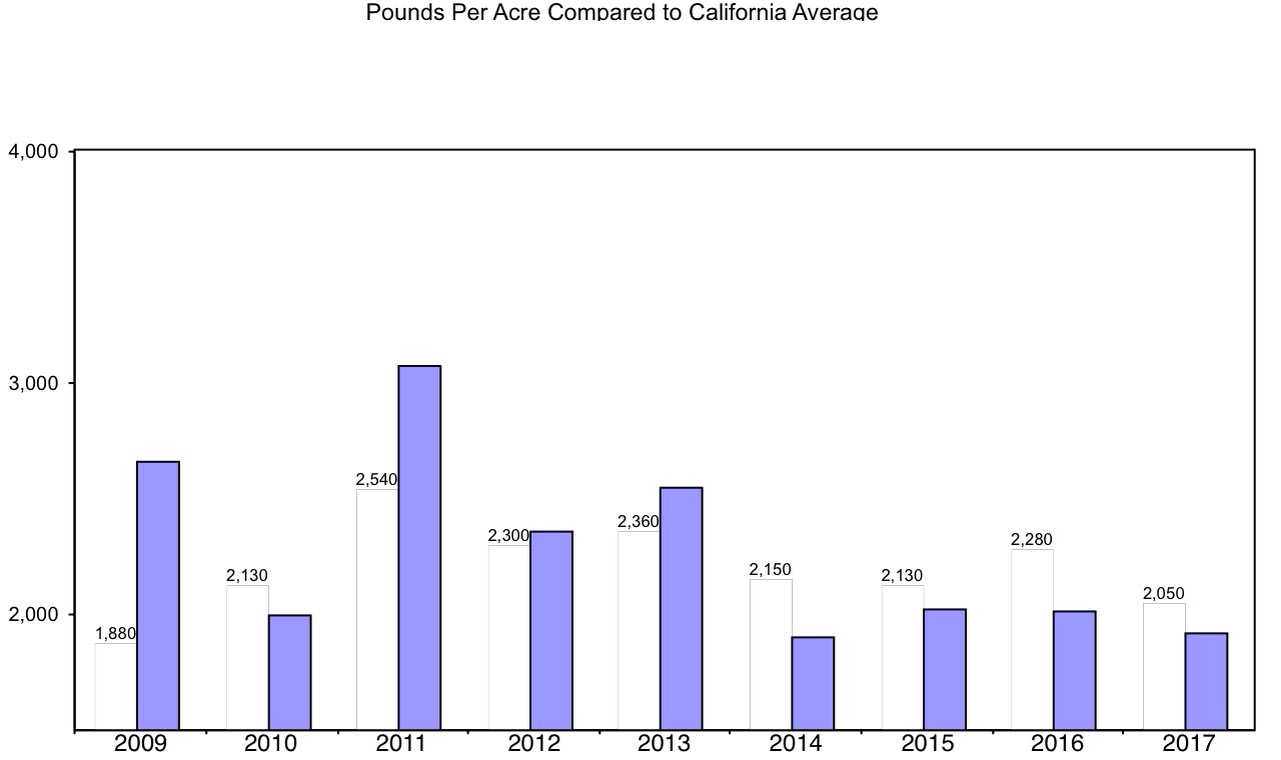
Inputs singular and combined determine outcomes.  Some are controllable and in order to quantify,  compare, and contrast production we would like to know about our tree and vine producers. We can judge performance against other farmers’ result averages. The Almond Board provides data for this purpose and we can readily see how we are doing in a macro sense. 

The white columns are statewide averages vs. the purple shaded which are ours. The density of trees on a given acre is assumed to be constant but you may not realize that this is not the case. In an effort to increase almond production new farmers are reducing the spacing between the trees and tree rows. (more trees/acre). Science says that, to an extent, there might be gains. A limiting factor would be the ability of sunlight to reach the individual tree.

Therefore a precise measure might be the tree itself. e.g. number of nuts per tree or number of pounds per tree. Whereas acreage is easily determined, number of trees — not so much. Referring to  previous post assumptions, we rely on our Harvester to provide a number. Insuring  Harvester honesty, we know that our tree spacing by design is: 22′ between rows and 18′ between trees. So, knowing an absolute number of trees we need only to subtract the missing to derive the actual.

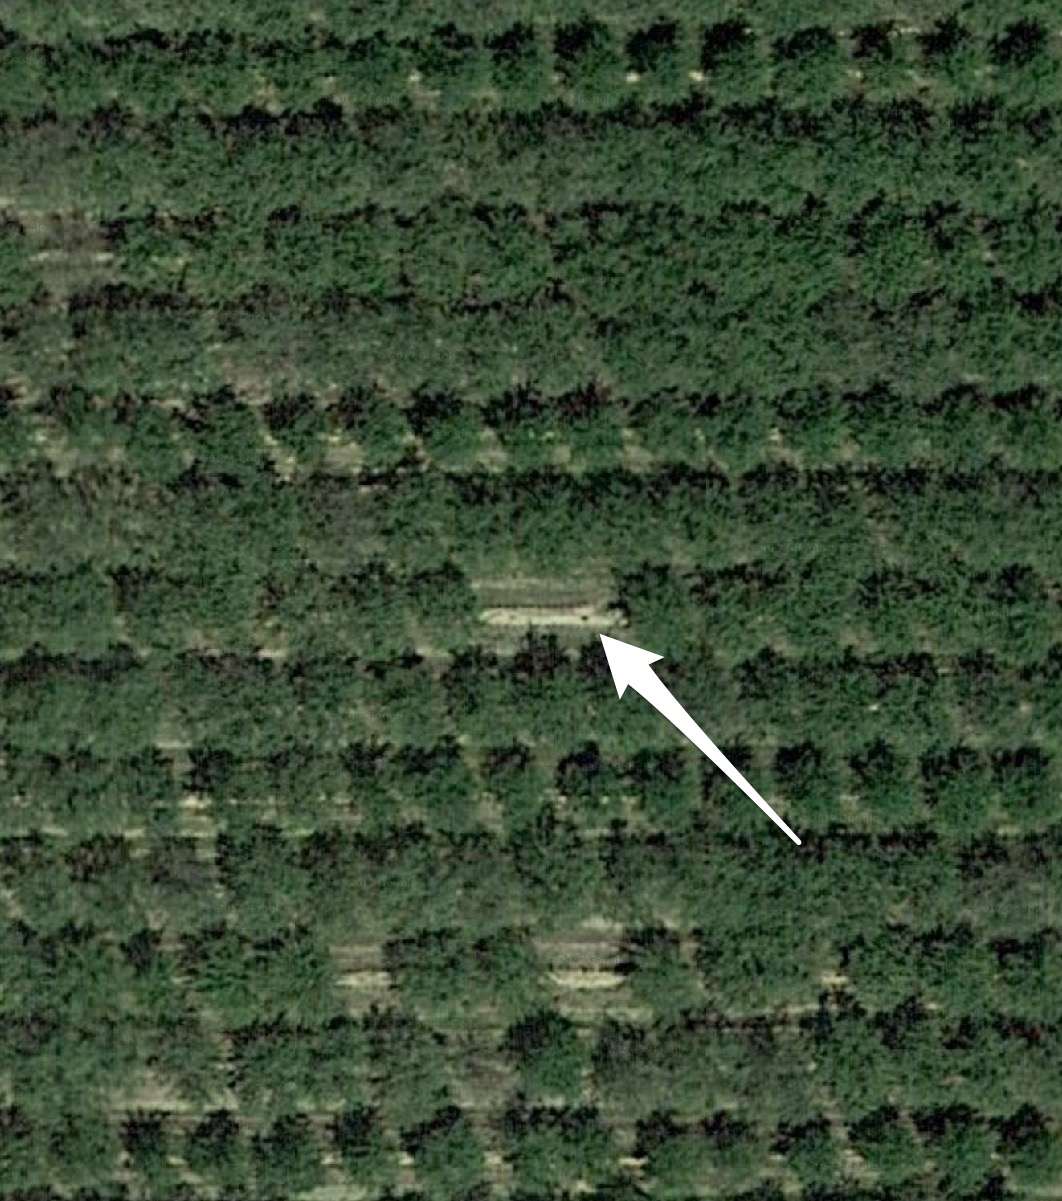
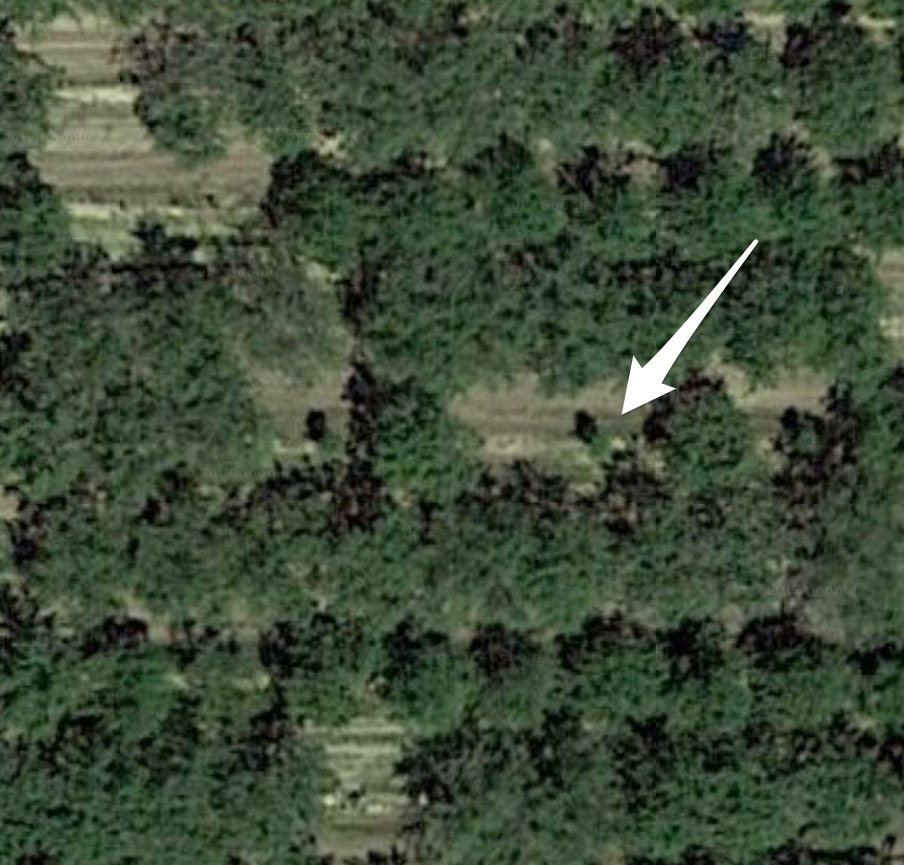
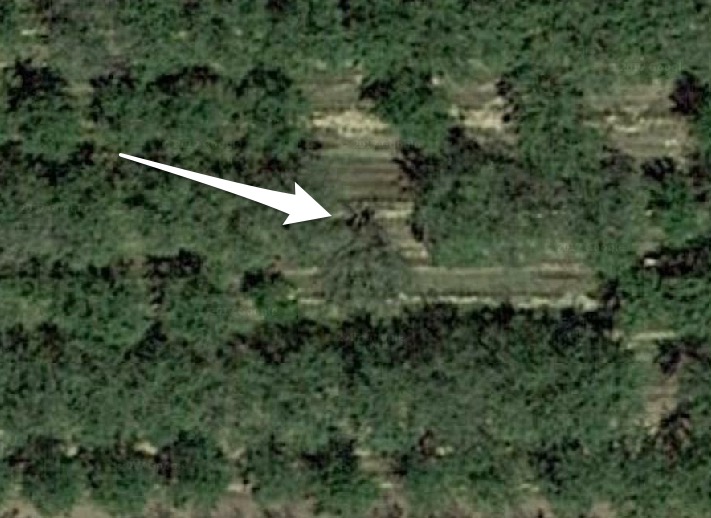
Let’s zoom in! Can’t get too close however, resolution is restricted. We have to squint in order to realize what we are looking at. Here is a key:

4 missing – you can make out a small spot that is either a hole in the ground or a stump


4 missing – observe 2 recently planted that are a couple of years away from becoming producers. Note the area of shadow (black) cast by the tree (green) 1 newly planted at bottom of this example or is it a remnant? It’s subjective at times.


Toppled tree – see how its canopy lays across the neighboring row. How many missing do you see here?

It is easier to count blanks, the sandy soil is a good contrast to the eye. In healthy areas the tree canopy merges. The individual trees are non-distinquishable in places. View the entire mapping project. I spy 680 missing from the East Block and 675 from the West Block.

Starting Punch

My (everybody’s) first reaction  is to replace the starter — the likely culprit. But that wasn’t the remedy for the symptom.

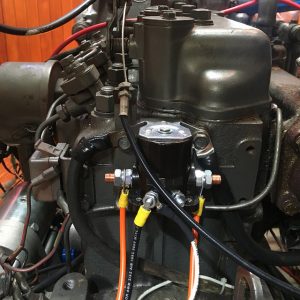
After a lengthy run from push-to-start button to engine starter the tired aged 12 gauge wire just didn’t have the umph to reliably close the internal starter solenoid relay any more. Voltage drop. The problem was getting to be worse and worse.

The correct remedy is the depicted solenoid to send full battery voltage directly to the starters internal solenoid. A solenoid for the solenoid. Added complexity and a possible failure point? Sure, but it’s doing the job properly during engine start attempts without the dreaded “click” sound instead of cranking action. The engine starter hits perfectly each time now.

It is simply mounted to existing bolt attachment points on the back of the Yanmar 3QM30 cylinder head. The starter button delivers, but less critically, to this lightweight solenoid that was sourced from an auto parts store. The wimpy current from the start button is enough to reliably make this one.

If need be, I can also run new larger gauge cabling to ignition switch and from starting button that will better cope with the distance that voltage has to travel.  That in conjunction with this new setup would make for a truly robust system. Better than when new.

Bad hunch / wrong trail to begin with, but I’m glad to have the fresh starter as peace of mind. The original is still serviceable and can serve as spare.

Sanitation

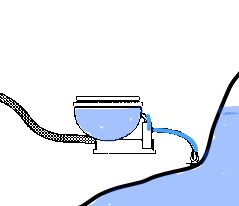
The Marine Head version 1.0 on Talmid is about to receive a much needed upgrade. Since day one the water level in the bowl would gradually over time rise to 1/2″ shy of the rim.  To counteract this annoyance I was compelled to shut the seawater inlet at the thru-hull; a good practice for times left unattended but a royal pain for after each use as it involves latching the privacy door out of the way, lifting up a floor panel setting it aside and then swinging a stiff awkwardly located handle 90 degrees. A bucket up on deck would be easier. Keep in mind that the reverse procedure (opening) is also required before use every time and sometimes in the darkness.

Reason? The rim happens to be near sea level which is too close for comfort. When the boat heels or moves about its axis in a seaway the contents would slosh out. Talmid wasn’t going to sink but nevertheless; water in the bilge…

I mistakenly believed that the tight fitting clearances of the rubber seawater intake pump impeller would be enough to halt this perpetual “running toilet”. So, a restoration kit was ordered but this rejuvenation was not a cure.  An engineered fix is required.

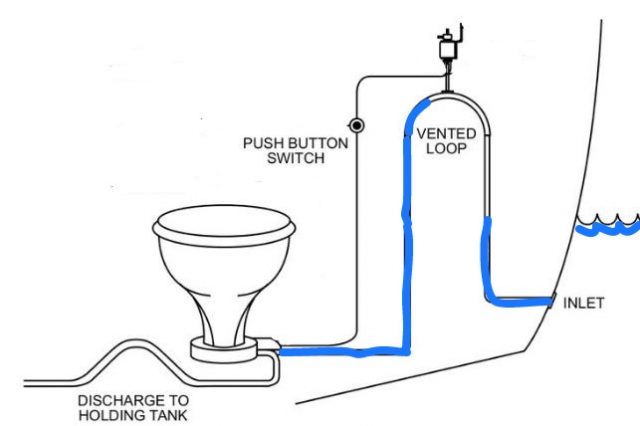
Version 1.5 will be the addition of a vented loop for the inlet. As it stands, outside water pressure has a direct equalization path to the bowl interruptible only by the manual seacock method.  Adding a bend to the inlet line and mounting that bend ABOVE the outside water level is the proper solution. v1.5

But hold on; the new loop may not work because of the siphon principle. As a prevention I will have to include a siphon break. That is the purpose of the [diagramed] gizmo mounted at the apex of the loop. It is an electrically actuated solenoid which allows external air to enter the loop forming an air lock.  Water ingress is cleverly blocked by the laws of fluid dynamics. The work of gravity will allow the water to fall away — the suction broken by atmospheric pressure.

The electric push-to-flush button is parallel wired to energize the solenoid which simultaneously actuates the vent closed, and runs the seawater intake pump. The seawater pump is self-priming so the air pocket previously introduced via the vent loop openstate will not impede.

Can’t wait to see if the fix works version 1.5 working properly.


Almond Fruit Maturation

Keen observers must realise that we have skipped the nut development stage. Recall that the play-by-play went silent after flowering and pollination; that is much more interesting because the process is quite visible, beautiful, plus added drama with the effects of spring weather. Since we like to keep things in-the-moment, Stage 2 Growth will be deferred until next time.

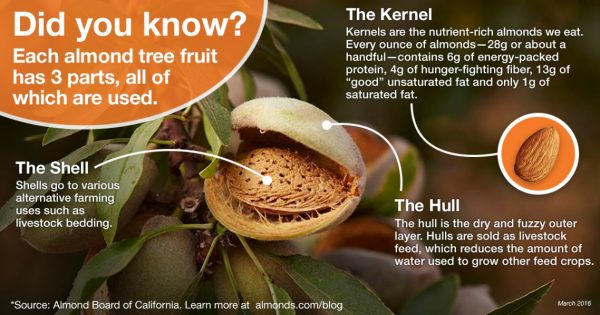
We are at Stage 3: Maturity. We can easily follow because, again, the phases are externally visible. The fruit components, beginning with the core, is the actual nut kernel, a hard shell, and enveloping these is the hull. 

The hull is of interest because at this stage it starts to split. The inshell nut is exposed in varying degrees. The kernel is still benefiting from irrigation water and nutrients but 85% of its growth development is already complete.

Hull Split  (dehiscence) is the term.  The hull is openable by hand at this point but in nature dehydration at the edges will fully expose the shell changing the shell color from white to brown.  A separation (abscission) between the hull and the tree begins. Once this happens the fruit might remain attached by a few fibers. These fibers will be broken during harvest when the tree is shaken and the nut falls to the ground.

There are external factors to consider during this split phase.  The hull must remain turgid by guarding against water stress and nutrient deficit to reduce sticktights. Too much irrigation risks hull rot. It’s a question of management timing; in other words, it only looks easy 😉

The hull split occurs from the top of the tree progressing downward. Harvest will usually commence at about 95% hull split but may occur sooner to avoid risk of NOW (Navel Orange Worm) or early fall rain.

Stay close! Harvest is next.