Category Archives: boats

Beneteau San Juans

It was a Beneteau Oceanis 381 with a layout similar to last years except below deck was a flip flop opposite. Only one quarter berth which was a full. Larger V berth forward. Diesel forced air heater which we used a couple of times. Chilly until noon. Sunny afternoons. Never rained. The AYC yachts are individually owned and you could tell that our boat was looked after.

Big galley with two refrigerators. Propane BBQ. Galley stove oven had a broiler.

Smaller Lav space (as if that was even possible). The holding tank was a mere 15 !! gallons and with strict eco regs in US waters that meant we really had to watch it. I had the pleasure of pumping it out twice. Well, pump-outs are encouraged by being free anyway.

We anchored out once. Picked up a ball at two other stops. BTW, you taught Spencer well on the fore-deck He was invaluable. Leah was a complete noobe on day one but by mid week she had it down and by voyage end had the sailing bug. Stayed on a linear mooring one night and one night on a dock. Also, we had to put our own boat in its slip back in Anacortes. No such thing as a marina skipper.

Cleared Canadian / US customs which was good experience. Navigation fairly easy with the GPS tracking and land ho. Fewer visual cues on the long sail to and from Victoria in which case it was GPS track and DR

I kept a watchful eye on tides and currents. We traversed a few tidal current rips but those were a non event. We had to be careful for floating logs. We saw several. Man that would have made a big noise to collide. Remind me not to sail there at night. Big container ships in the lanes too. The most current was 2.5 knots which didn’t last long and luckily was going our way.

The most wind that we saw was 16 knots at which full sail was slightly over powered close hauled. The main sail could be furled into the mast. Very trick. 1 to 2 foot wind waves at times. For the most part the wind was 6 to 10 knots. The ride was always good. Our charter had Radar with AIS if we’d have been caught out by fog but we were only concerned once and it turned out not to be a factor.

Like Father like son, Spencer almost did an endo off of the transom but fell into the dinghy instead. Whew!

53 degrees. I was concerned about going overboard while underway and nobody noticing right away. That would have been bad scene.

Short Trip

What was meant to be a grand outing, taking family on a Saturday sailboat ride turned out to be a “3 hour tour” instead. No not island shipwrecked; we all returned to the dock intact — but not before an encounter with a dredger train of barges, a soft grounding, a crab pot entanglement, engine breakdown, 2 rescue tows and a mangled boat hook! It was a chain of events. One thing upon another, and then another and then…

It’s never opportune timing to have mechanical failure but in this case we were very close to home. However, the marina is tight quarters and their rules forbid maneuvering under sail anyway. So we got professionally alongside towed on the hip. Here was the culprit:

Riser – ruptures after years in service

I found that this is actually a common failure. It is unsuspecting before it happens because the heavy iron casting rusts from the inside. There may be light surface corrosion on the outside or even shiny paint hiding what lurks. (A prudent Sailor will think to change this part out before it expires.) The failure symptom was a marked change in engine tone. Raising the hood revealed noxious black fumes and water pumping into the bilge. Gnarly.

The exhaust mixing elbow (aka Riser) is a short length special pipe between the engine manifold and the heavy black hose clamped on the lower end. Hot gasses are joined with cooling water and delivered under pressure of combustion toward being muffled and
properly discharged overboard.

Spiffy Replacement

This new custom fabrication is stainless steel and will give good endurance. Should be good to go! I only need now to convince my guests to come along and try boating again. Please come back!

Under Pressure

or not…

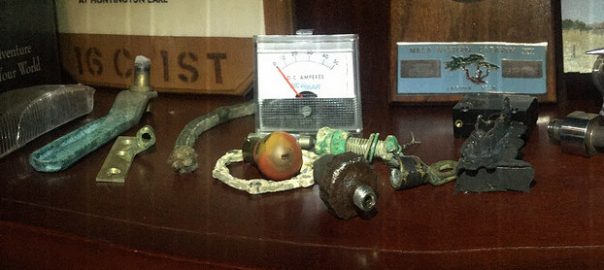
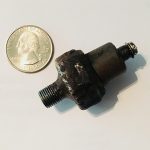
pressure switch item from the shelf of items

Every item on my shelf of items has a story. This is an oil pressure transducer. Its design goal is to alert the operator, via red light and aural warning when there is no pressure. It is a 7 psi switch that taps into an engine’s oil gallery. Its default is closed meaning that when oil pressure is non existent it allows 12 volt current to complete a circuit and provide warning. If there is pressure the switch is open and therefore, no circuit. Everything is quiet and the machine in operation is assumed to be a-okay.

Tracing a route down the Savannah River on my way out to sea, I heard a chirping noise that turned out to be the alarm system just described. It wasn’t a full on signal just an indication that it was on the cusp of something. Imagine my concern. I reduced the throttle on my auxiliary diesel and the alarm came full on. Adding power and the alarm grew silent. It was unnerving, without an actual pressure gauge for verification, I couldn’t know whether, the engine was on its last legs or indication system anomaly.

I decided to error on the side of caution and discontinued engine usage, relying on the wind and sailpower to delivery me home. If the engine was to die it would perform a final task of delivering me the remaining few yards and into the waiting marina berth at end of journey.

The diesel ran fine when restarted for arrival and when shutdown safely back at home port. Further, the antagonizing low pressure warning from before never recurred.  Phew! I had been under pressure. Now I need to confirm if in fact the transducer switch had perished or was it trying to tell the truth.

There are just a few causes of low oil pressure:

  • Oil level extremely low
  • Oil viscosity very weak due to contamination and thinning
  • Engine wear tolerances usually bearings or oil pump

The oil quantity was easily ruled out as I use the dipstick check as a matter of pre-flight. The quality of the oil itself was a bit harder. There wasn’t any coolant mixed in so that was quickly discounted. I couldn’t be sure that diesel fuel wasn’t leaking into the crankcase. A laboratory oil analysis would be handy because all I could witness was slimy black ooze squeezed between fingers. That leaves the third bullet – this engine – which definitely qualifies. It has been in use for over 30 years and while loving cared for, it has aged.

Process of elimination: I pulled the oil filter and poured its contents into a plastic cup. I could have sent it off to a lab but I presented it to an experienced type in the boatyard facility for a free opinion. The pronouncement was plain ol’ used diesel crankcase oil. No unusual appearance or telltale odor.

That leaves the ultimate showdown — engine vs indication. I sourced a generic  pressure gauge that when fitted to the port where the [removed] transducer switch had lived, would solve the question once-and-for-all.

The TEST: Ran engine through various speed regimes. Starting cold and also running under load at normal operating temperature.

Initial observation is that the pressure transducer switch is suspect. All of the readings were well above the 7 PSI threshold of the switch. It will be replaced. The only troubling aspect were some of the erratic recordings. This may be because of the simple gauge utilized. I did see some spikes that couldn’t be accounted for.  In any event, 45 psi seems to be the average norm and an acceptable result.

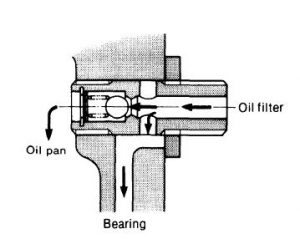
Not completely convinced. Follows is a diagram of the internal pressure regulating valve. Has the appearances of a complex engineering diagram but in reality it’s just a spherical ball held against a relief orifice by a simple spring. 

This is such a basic design and would be a rare point of failure. It either works or it doesn’t but might be explanation for the slight variances or fluctuations. A quality gauge would have dampening built in as a feature to eliminate erratic needle movement.

The engine manual lists standard pressure range as 35.56 ~ 49.78 as spec.  I feel more confident after this test but it’s still on watch.  I will continue to monitor (under pressure) until full trust is restored.

vintage diesel YANMAR 3QM30 at work

Voyages of the Talmid

North Carolina / Georgia Loop

[available: full size presentation]

This 475 nm cruise was a mix of coastal offshore and the AICW. Each have challenges. They both offer scenic splendor with a bit of adventuring

Typically, the inside passage is a pleasant ride with smooth water and most would choose it for comfort. It is much slower because of its twists and turns. Due to lack of maneuvering space it can’t reliably be sailed and must be motored. In fact, the ICW is very narrow in most cases and a rigid course line must be strictly followed to avoid getting stuck in the mud (run aground). Further, it is generally unwise to traverse the ICW during darkness for it is difficult to spot hazards to navigation. With a bit of planning there are many option locations for stopping to rest and at days end.  I find the venue a nice change of pace and even though helmsmanship is very high workload it is likely that one will have a genuine restful night at anchor — just be mindful of the mosquitoes.

Coastal offshore is very different and you must have a stomach for it as there is constant motion depending on the sea state.  Aside from the continual action attributable to wave and swell, it can be somewhat relaxing and less stressful, your body does adapt to this environment. Glorious sailing is possible and one is able to minimize the use of noisy auxiliary diesel power. Talmid, with a displacement hull / full keel, is happiest in the deep blue and with shallows and bridge crossings not being a factor. With an adequate watch routine you needn’t make layovers and can track nonstop. If wind permits, follow a rhumbline course and the miles click by. The autopilot steers your course freeing the mind to keep tabs on the big picture and contemplate life.


Marine Carburetor Labyrinth

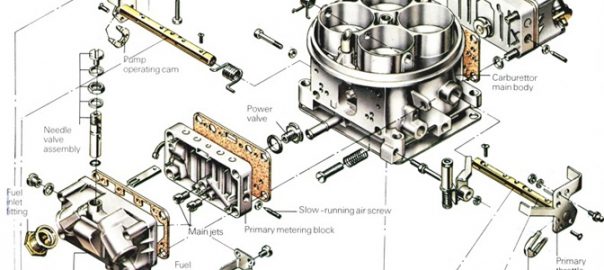
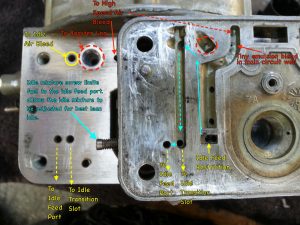
You’d think that a brand new marine carburetor would bolt on and function perfectly out of the box but I’m finding out that you have to fuss with it. I’m focusing on the Idle circuit because turning the Idle Mixture Screws is having no effect on my less than smooth running engine.

I’ve learned a few things from Randy, a good ol’ boy sharing his sense of experience on a Youtube channel. Studying the intricacies of the casting; all facets to figure the fuel trail and how it gets from here to there, I now know that there are dual routes. See if you are able to follow:

Fuel arriving from the Primary Float Bowl is flow limited by the Idle Feed Restriction (solid yellow arrow). The fuel is drawn upwards through an internal passageway (solid turquoise line arrow) to the top of a parallel downleg (dashed turquoise line arrow) to be split off to the Idle Feed Port and to the Idle Transition Slot. Small air is also  introduced via the Idle Air Bleed (solid yellow circle) to mix it up with the fuel traversing the downleg.

The dual pathway ports (dashed yellow arrow lines) deliver the the air/fuel emulsion to the Idle Feed Port and the Idle Transition Slot  in the throttle body below. The throttle body contains large butterfly valves that allow significantly more big air to mix and swirl making a combustible mixture. This [ stoichiometric ] ratio is roughly 15:1

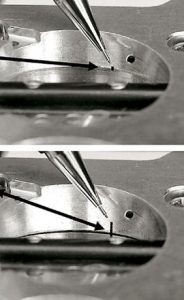
What’s happening with my application is that the throttle valves are exposing too much of the Idle Transition Slot (lower image detail). This has the undesired effect of creating an excessively fuel rich mixture.  The Idle Feed Port is not in the game passing little or no air/fuel. The Idle Transition Slot is doing it all.  Allowing the throttle to close down further will hide most of the slot (upper image detail) The Idle Feed Port (the small black dot) will resume its function with the Idle Transition Slot properly obscured. The Idle Mixture Screw can then be brought to bear allowing for precise tuning.

Final consideration: Closing down the throttle valves will by nature reduces the air volume. The engine will stall. In order to restore adequate airflow, a hole (~.080″) must be drilled into each butterfly. It will be trial test with hole size until the ideal diameter is reached. Starting small, I want to get the engine idle RPM into a ballpark range. Fine RPM adjustment can be made with the Idle Speed set screw at the throttle linkage.

That concludes the custom setup mentioned in this post intro. Idle Mixture screws will be controlling at slow idle. The Idle Transition Slot will become effective once the throttle is part open. Keyword is transition.  A fuel main circuit gradually provides even more fuel as demand calls in a seamless progression from idle to full power. Keep it smooth.

Starting Punch

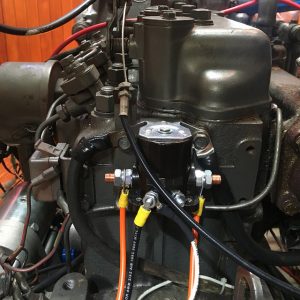
My (everybody’s) first reaction  is to replace the starter — the likely culprit. But that wasn’t the remedy for the symptom.

After a lengthy run from push-to-start button to engine starter the tired aged 12 gauge wire just didn’t have the umph to reliably close the internal starter solenoid relay any more. Voltage drop. The problem was getting to be worse and worse.

The correct remedy is the depicted solenoid to send full battery voltage directly to the starters internal solenoid. A solenoid for the solenoid. Added complexity and a possible failure point? Sure, but it’s doing the job properly during engine start attempts without the dreaded “click” sound instead of cranking action. The engine starter hits perfectly each time now.

It is simply mounted to existing bolt attachment points on the back of the Yanmar 3QM30 cylinder head. The starter button delivers, but less critically, to this lightweight solenoid that was sourced from an auto parts store. The wimpy current from the start button is enough to reliably make this one.

If need be, I can also run new larger gauge cabling to ignition switch and from starting button that will better cope with the distance that voltage has to travel.  That in conjunction with this new setup would make for a truly robust system. Better than when new.

Bad hunch / wrong trail to begin with, but I’m glad to have the fresh starter as peace of mind. The original is still serviceable and can serve as spare.

Sanitation

The Marine Head version 1.0 on Talmid is about to receive a much needed upgrade. Since day one the water level in the bowl would gradually over time rise to 1/2″ shy of the rim.  To counteract this annoyance I was compelled to shut the seawater inlet at the thru-hull; a good practice for times left unattended but a royal pain for after each use as it involves latching the privacy door out of the way, lifting up a floor panel setting it aside and then swinging a stiff awkwardly located handle 90 degrees. A bucket up on deck would be easier. Keep in mind that the reverse procedure (opening) is also required before use every time and sometimes in the darkness.

Reason? The rim happens to be near sea level which is too close for comfort. When the boat heels or moves about its axis in a seaway the contents would slosh out. Talmid wasn’t going to sink but nevertheless; water in the bilge…

I mistakenly believed that the tight fitting clearances of the rubber seawater intake pump impeller would be enough to halt this perpetual “running toilet”. So, a restoration kit was ordered but this rejuvenation was not a cure.  An engineered fix is required.

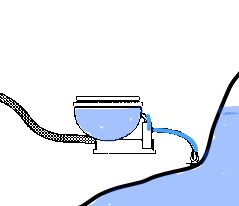
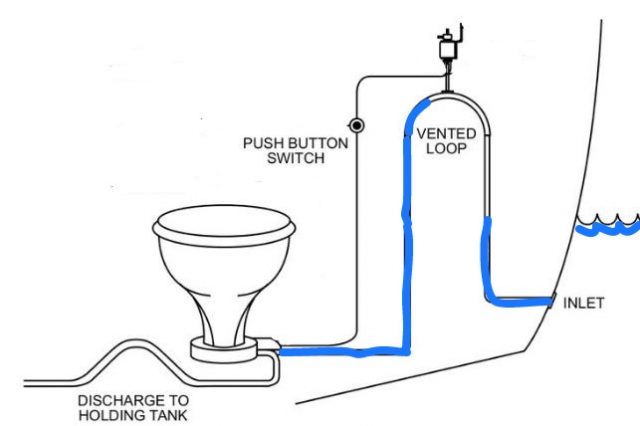
Version 1.5 will be the addition of a vented loop for the inlet. As it stands, outside water pressure has a direct equalization path to the bowl interruptible only by the manual seacock method.  Adding a bend to the inlet line and mounting that bend ABOVE the outside water level is the proper solution. v1.5

But hold on; the new loop may not work because of the siphon principle. As a prevention I will have to include a siphon break. That is the purpose of the [diagramed] gizmo mounted at the apex of the loop. It is an electrically actuated solenoid which allows external air to enter the loop forming an air lock.  Water ingress is cleverly blocked by the laws of fluid dynamics. The work of gravity will allow the water to fall away — the suction broken by atmospheric pressure.

The electric push-to-flush button is parallel wired to energize the solenoid which simultaneously actuates the vent closed, and runs the seawater intake pump. The seawater pump is self-priming so the air pocket previously introduced via the vent loop openstate will not impede.

Can’t wait to see if the fix works version 1.5 working properly.


Hot fun

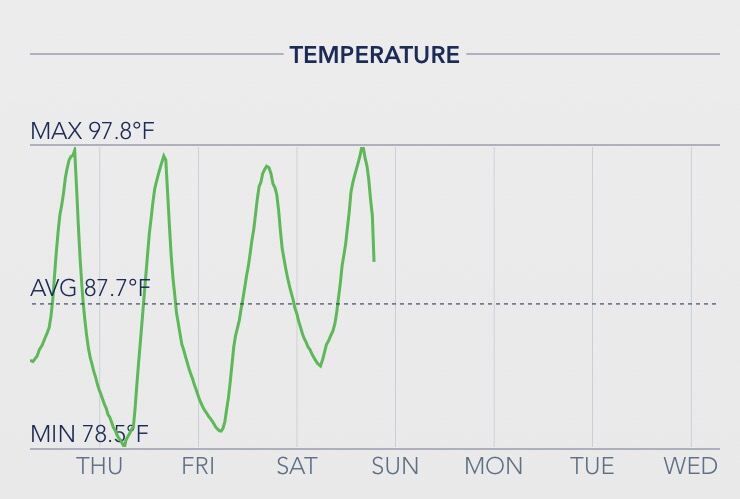
A July afternoon on anchor was a near experience in heat stress. Keep in mind that A/C is a shore powered luxury only available at the marina; on the water you take what you get. This outdoors lifestyle can be pleasant, even on hot days, if there is a breeze across the water but during this exposure wind was calm.  [Cod Harbor Tangier Island.]
…and from the picture evidence observe the lone crab pot in a sea that is flat glass. The opaque sky seems to merge horizonless into haze and humidity. You can take a dip in the sea but with a water temp of 91 indicated it is not refreshing. The sun is high and shade areas on deck shrink The only escape is inside the cabin below.

This is the representative cabin temperature log. Strip down and perspire. Try to hydrate. The water from onboard tankage is room temp. Hopefully there are some ice cubes left in the refrigerator box.

This was two days later on the Potomac. Same temperatures but with wind relief. Very nice. Even looks cooler doesn’t it?

Crab Pot

The bane of intracoastal cruisers these seasonal traps are everywhere. They are at times waywardly placed in the middle of navigable routes, which is where we connected with one or should I say connected to us. It was broad daylight (and you can imagine the extra challenge at nighttime) and was unseen but suspect when we heard and sensed a thump. A crap pot consists of sunken coup resting on the seabed, a stout retrieval line is floated to the surface by a marker buoy. Boaters must scan for these little floats but they are easily obscured by wavelets and glare. The float marker, styrofoam and plastic, can be harmlessly nudged aside by the hull but it’s the attached rope that is drawn to your spinning propeller that is the spoiler.

After the unexpected bump scan checked engine RPM and detected no changes in sounds or frequency but did note a loss in speed of about 1 knot. Aside from the thump this was the only clue. The only way to know for certain was to inspect the prop.

The prop is about 2′ below the surface and the only way to view is to stop and go over the side with mask and flippers; an unscheduled swim.

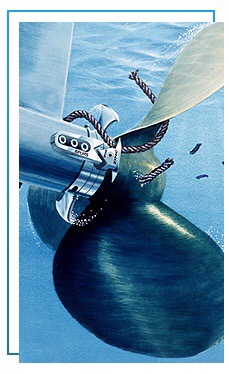
Most of these pesky hazards are in coves and harbors, anchorages are littered although in fairness they are distributed in linear string fashion every x number of feet. When you are anchoring they can be intimidating and always a challenge to stay clear to avoid mixing. If you happen to tangle, your prop is likely to be jammed into a non-functioning balled up mess. A saw tooth hand knife is necessary to laboriously cut the cord away. An enterprising idea is to install a set of propshaft blades that act to preemptively slice and dice.
I’m not convinced that this would actually work effectively at slow maneuvering RPMs in an anchorage or when using reverse.

During my impromptu inspection I discovered we had indeed been fouled and had been dragging an entire bundle of float, line, and trap for a mile. Our prop-wash had slammed the float through the propeller aperture snagging on the rudder without the line wrapping up in the prop. Phew! Lucky easy removal for us — but not for the Waterman. He will be wondering where his Crab Pot and Catch are…