A broader flattened and padded safety hub was introduced with the 1959 W111 ‘fintail’ model. This engineering effort was years ahead of other makes. The padding may have been a false sense of security but the expanse would improve chances in case of accidental impact. Previous hubs were decorative and could be pointy (harpoon spear shaped).
Donor hub
Serving its purpose for years after having been liberated from Dad’s 1967 200 D (W110) which was pretty used up, I’m certain that this relic piece survived the car. It now lives on the shelf having been replaced with a reproduction part that is a near match to the original ivory one.
The wheel rim has stress cracks so it too will have to be restored at some point but Mercedes bling is like jewelry $$$. So, methodical pace.
These early cars had primitive seatbelts (if that) so any passive protection from the steering wheel is appreciated.
I’d released the counter springs on the hinges decades ago and so the hood would no longer hold itself up; not without a prop rod. The springs were tensioned to their weakest setting and I knew not how to increase it. Tools on hand at the time were a pair of vice grips with bailing wire; good enough to release a spring but clumsy. Coil springs have stored energy and can cause injury when mishandled. Uncertain about how to [properly] go about it and a bit apprehensive the job was put off. Fast Forward today to the Internet Age; a Youtube hit gave inspiration.
If the springs could be extended and placed in the hinge’s more extreme setting slot then the increased force under tension would correctly balance the open hood. Unfortunately, the size of each individual spring (one per hinge) was such that mere muscle power would not overcome the difficult flexing required to get that job done. Leverage was needed.
rope line loop used to coax the spring
A couple of Ratchet Tie-Down Trailer Straps provided the persuasion. An concrete post in the garage floor lent an immovable anchor point. A second strap maintained a proper pull angle since the post was off center.
ratchets serve as a Come Along
The ratchet acting as a winch provided the grunt and the ear of the spring was positioned adjacent to its proper location. With care and finesse the spring could then be hooked over the tang and into the correct slot on the hinge mount.
I have to give thumbs-up acknowledgement to the Youtuber DIY; he sure made it look easy. Well, it’s never easy but a least now finally — no more prop rod! A bucket list project perceived as insurmountable all these years gets resolved.
Old cars had running boards. A vestige from this bygone era, the modern car door sill is nothing more than a decorative piece to prevent one’s shoes from scuffing the body painted entry threshold. This plate is likely to be of plastic assembly with the make or logo embossed. On the exterior side is the tarmac and the other side is the carpet. When shut the door covers the sill plate.
The door sill/scuff plate on ‘Ponton‘ era Mercedes-Benz were not that far removed from the old running boards. They could be described as internal running boards as they were enveloped by body when the closed door overlapped them. They are really not wide enough to stand upon nor were they so intended but there they are welcoming gateway to driver and passenger. From the illustration below observe that the vertical chrome trim plate and an aluminium surround piece serves to offer scuff protection. The flat sill spans between them.
perished mat
The original rubber sill (above) is aged and brittle. It has seen better days. The refurbishment project was initiated some years back (pre-internet) where it stalled due to non-availability of replacement parts. Recently, I began the search anew. The problem is that there is no longer much demand for this style ribbed rubber material. What I could find was in black only or some egregious industrial offering. The pursuit picked up when I found “grey mat for Mercedes”. ‘Imported’ from the limited description sounded promising but the bulk size and color were not and were likely for some later model.
new mat in place
Finally, success! An outfit in Germany called Niemöller Ersatzteile für Mercedes-Benz Veteranen seemed to have what I sought. I ordered their self-described hellbeige ribbed rubber with high expectations and was not let down. The material was rolled in bulk so a paper template had to be drawn and the mat trimmed. The new piece was cemented down after the fasteners removed and the shiny bits cleared for access.
Factory labor intensive, I counted 15 individual screws for each door entry (for which holes also had to be drilled). I don’t suppose that they had bots or even electric screwdrivers to speed that process. A contrast in manufacturing technique, today’s sill plate application must take the assembly line person mere seconds to snap in to place.
Uncontained fuel is volatile and a safety issue but there are degrees. Here is a list in order of seriousness:
Gusher – shut off, get clear, notify the EPA
Oozer – flow in a very gradual way, No Smoking!
Leakage – drip drip drip, a puddle will form, have a Fire Bottle close by
Seepage – see leakage, a nuisance, a puddle forms only after some delay
Weepage – localized moist or damp area, could be deferred… if you feel lucky
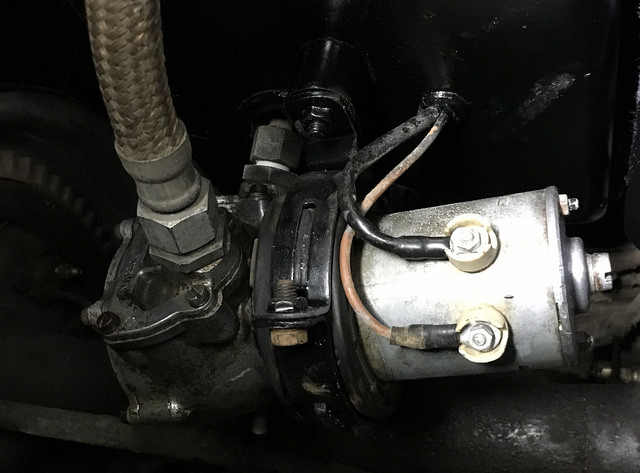
Sometimes Seepage will, overtime, fix itself and become Weepage. My fuel pump, when off, was the latter. Containment was not difficult, however when operating [pressurized] there was definitely a leak. The old seals had become dry and hardened from disuse, decay, and exposure to old gasoline and would no longer stem the tide.
Happily there is a restorative kit available though billed as a solution for the models W113 [Pagoda], W111 [Fintail], and certain W108 models using the “Long Style” pump. Mine was an early 1st version and I was confident that it would be suitable.
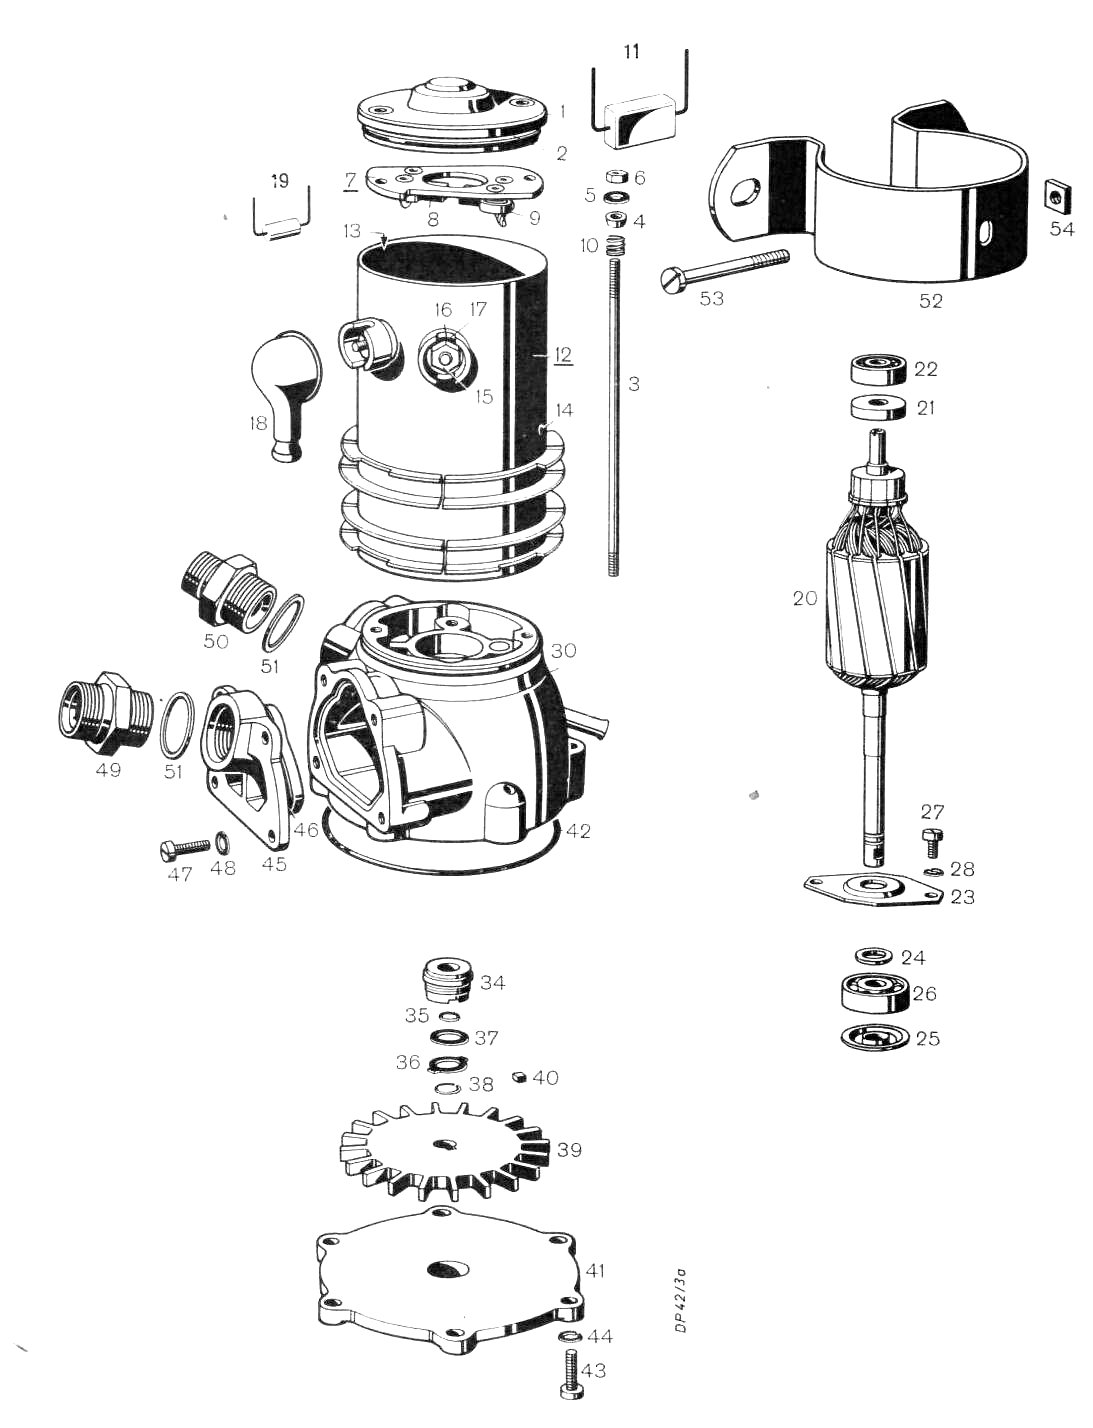
exploded diagram (no pun intended)
The way to find out was to order the package, disassemble, compare old parts with the new replacement and find out. The many pieces included 6 “O” rings. These would solve the escaping fuel problem. Also included were new shaft bearings and motor brushes. After 50 years / 125,000 miles use these original wear items had served their purpose. A tutorial explained the inner workings and was invaluable. The method for keeping fuel from going past the shaft housing was a clever bit: To seal the shaft to the pump housing there is a black plastic-type insert with what looks to be a neoprene collar that fits into the opening of the housing. It has a flat surface that matches a flat surface on the Bellows seal. The Bellows Seal is called a “Mechanical Seal” or “Slide Ring Seal”. A small O-Ring seals the Bellows onto the shaft. The Bellows Seal sits on the O-Ring and rotates with the shaft held in position by the locating washer. … and so on and so forth.
I merely had to follow the instructions and was only flummoxed when I compared my [removed] washer with that of the cup shaped washer from the picture tutorial. They didn’t look the same; not one bit. I rationalized that it was my 1st gen design and at this point it was deep thought and analysis to achieve understanding. The new bearings were sealed type and so I left the little cup washer out completely — thinking it superfluous. I didn’t want to alter the shaft [shim] height orientation but I deduced that its absence would not and even became convinced that it could have been a detriment.
Still, having a piece left over after reassembly is unnerving and leaving it on the bench was a leap of faith. Fingers crossed there.
Last task was to dress the commutator. Wear and tear had built a ridge of copper, or rather a valley from the carbon brush(s) track. I knocked that down ever so gently and precisely using a fingernail file not wanting to booger the armature.
how it was
Finally, the unit was complete (excepting the confused washer) and was buttoned up and re-installed. A twist of the Ignition Key would determine success or failure. I poured fresh fuel into the tank checked for Seepage. So far so good. Jumped in the driver’s seat and turned the key. The pump at this point should and did run; purring quietly. Most importantly, no Leakage. Hoorah! and again roadworthy.
Something was amiss as 2nd was difficult to engage without clashing and then it would pop-out of gear under load. Poorly adjusted linkage? Bad syncro? Big overhaul?
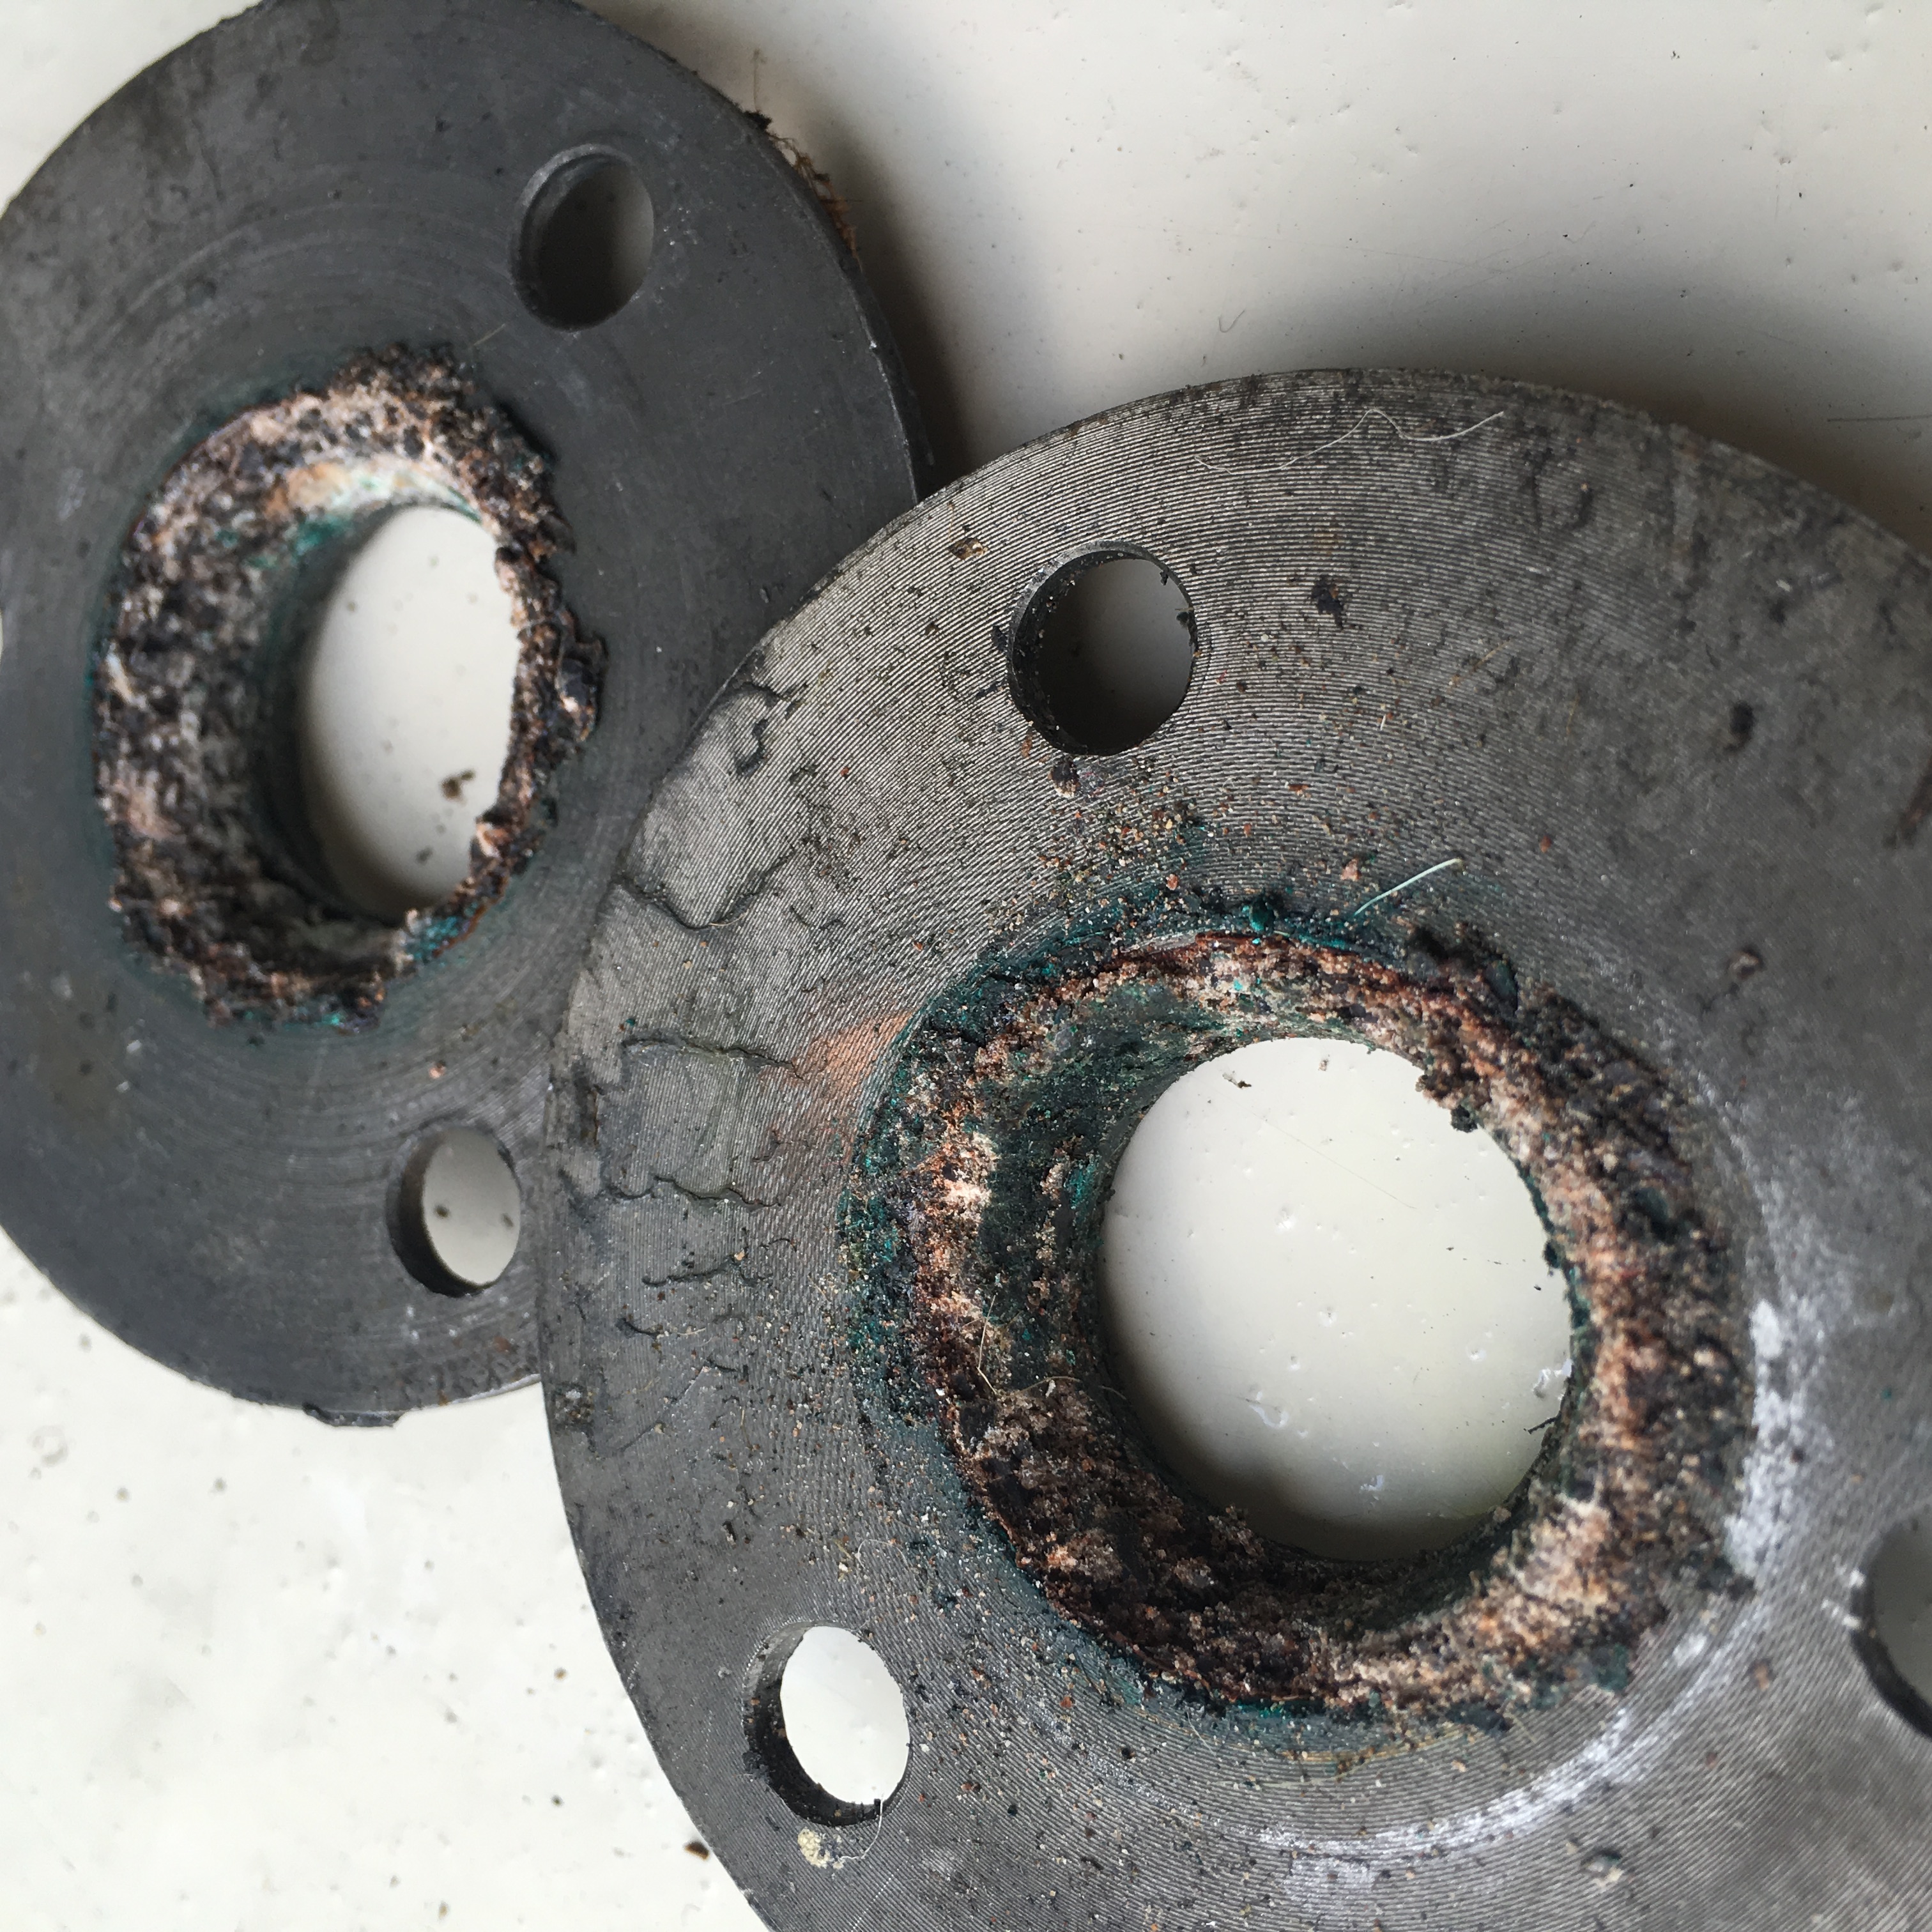
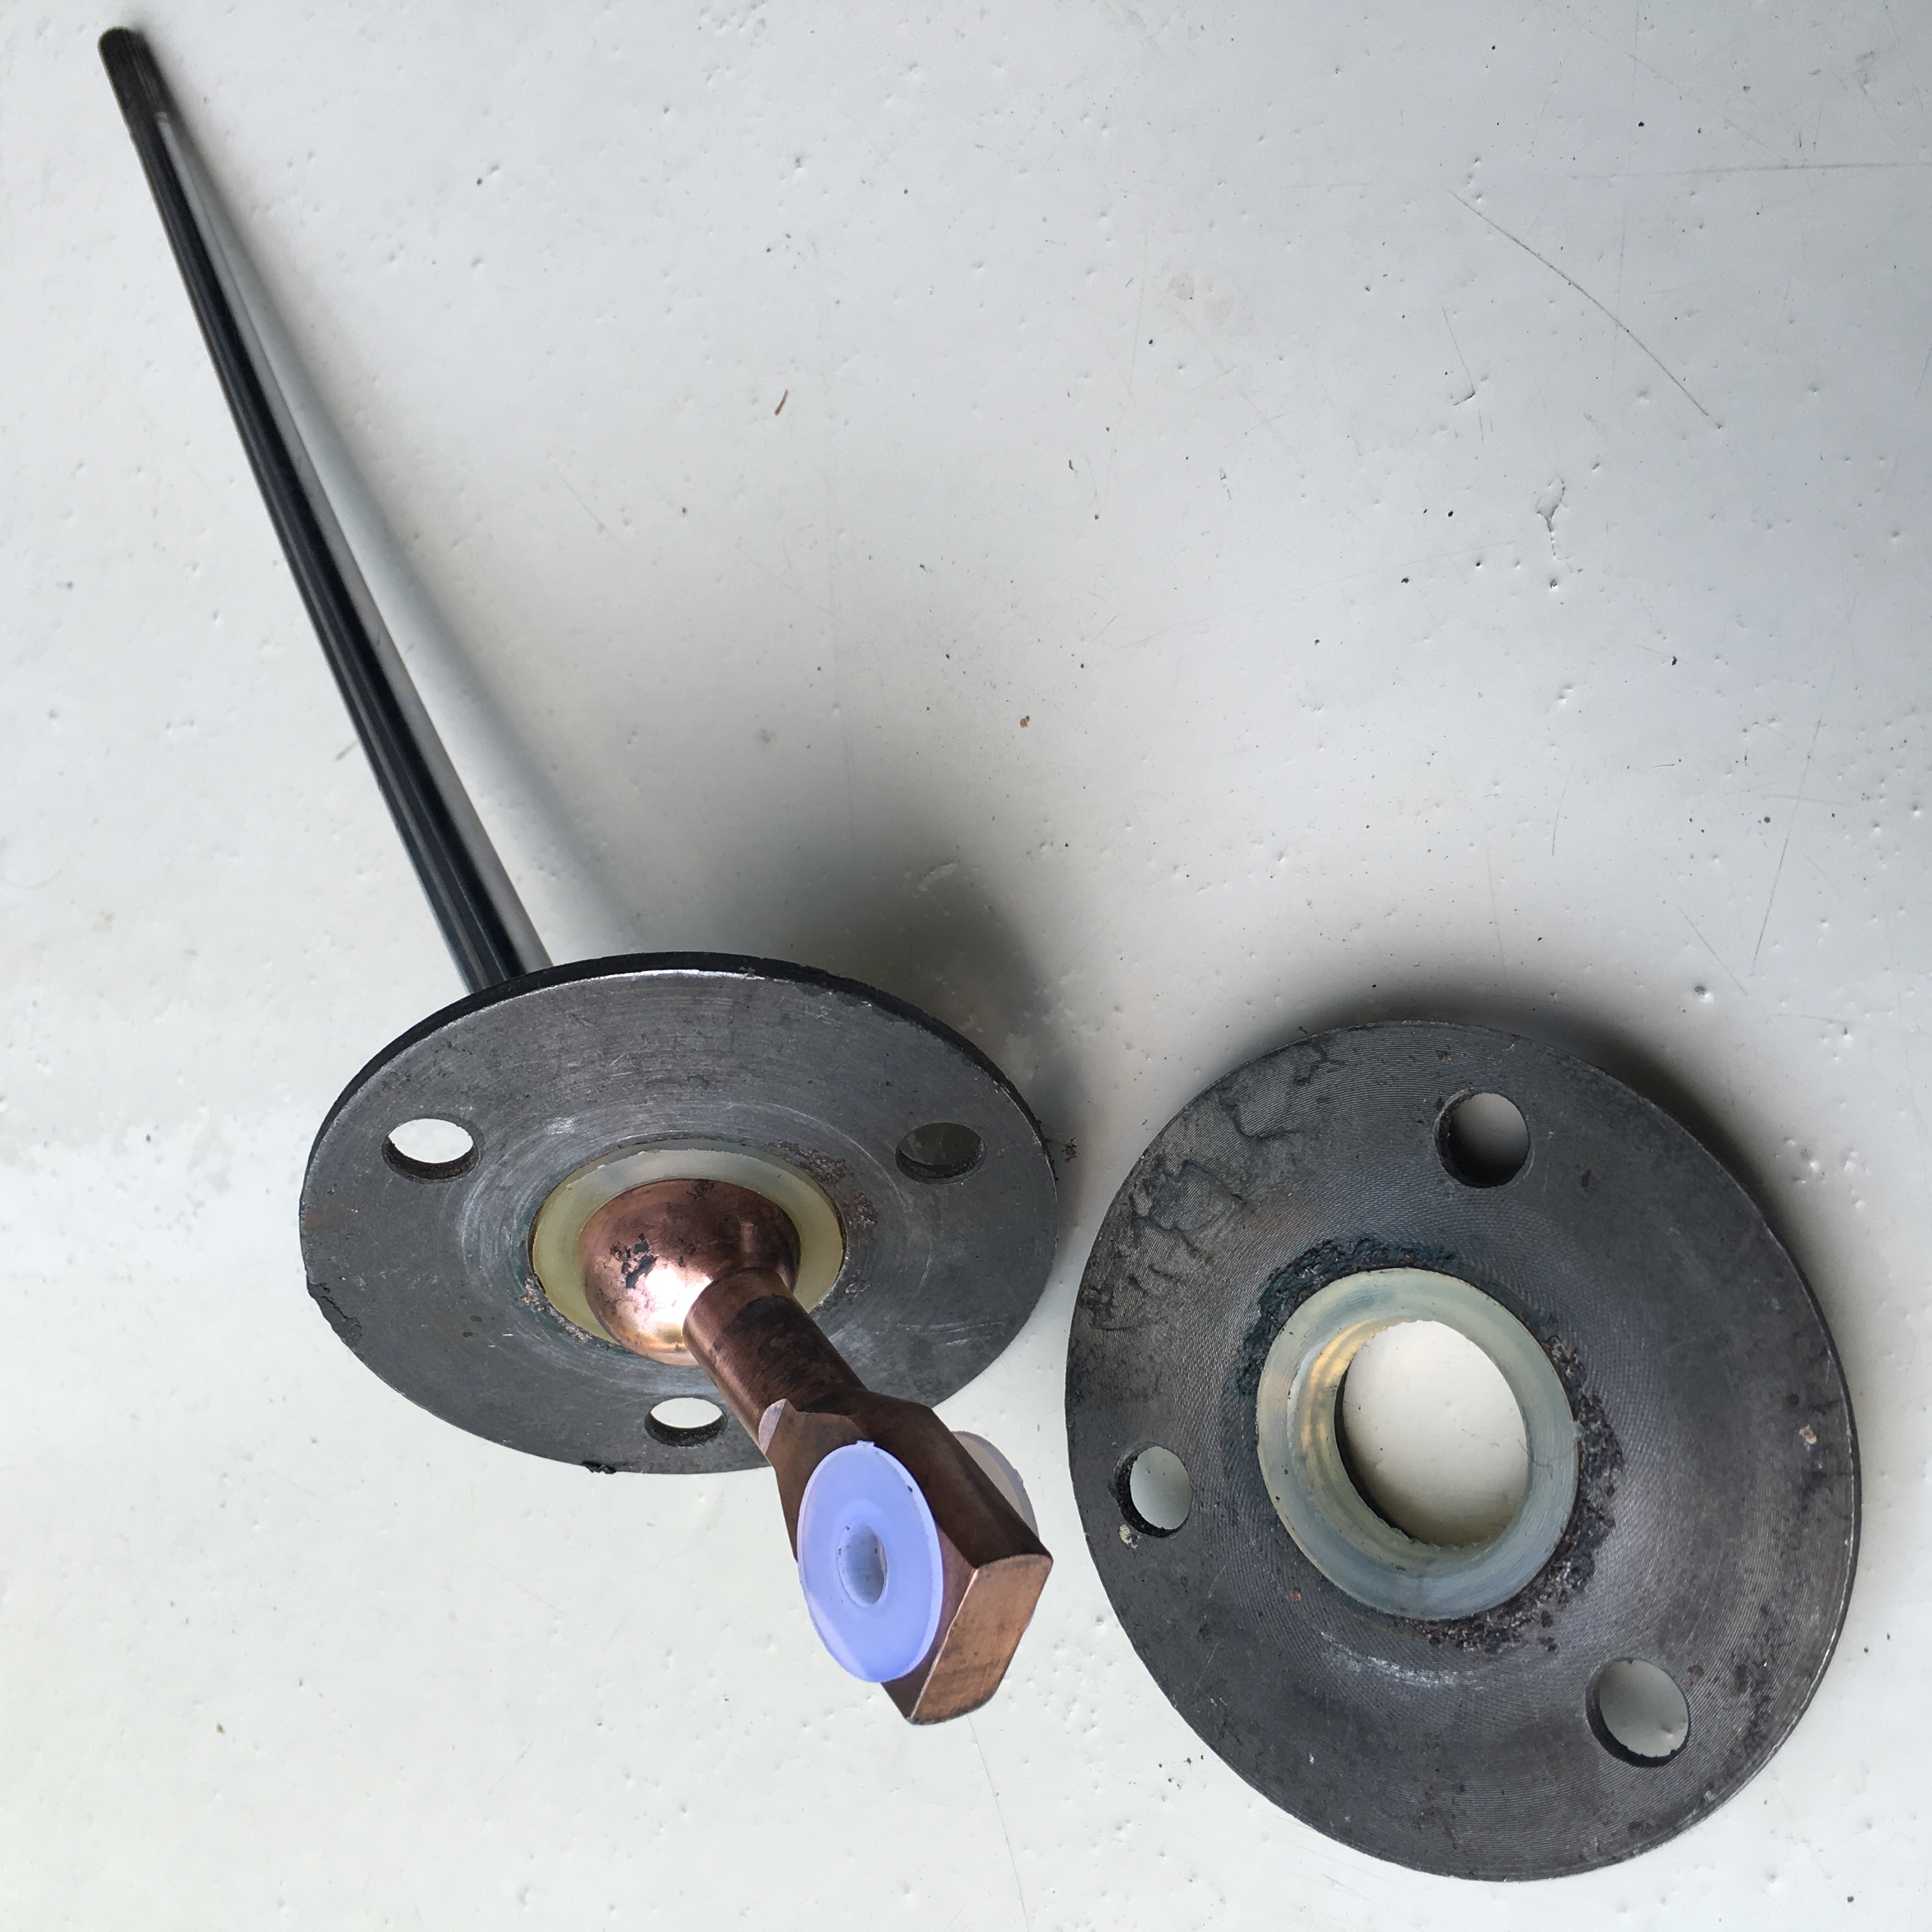
remains of bushing material
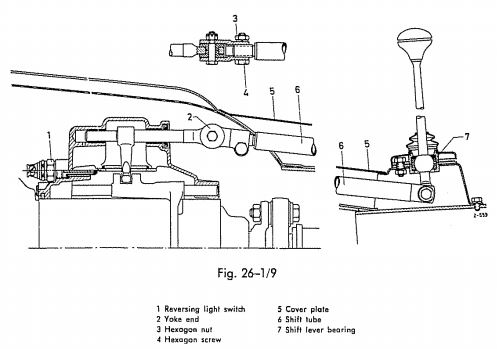
None of the above. Inspection of the shift lever arm and yoke revealed that the rope-like material originally used for bushing had perished. The shift lever bearing (#7 in the Fig.) was sloppy and wobbly loose in its retaining bracket and no longer capable of fulfilling its function as a pivot axis. Fresh bushings were sourced.
This was a bit of a challenge because the original gearbox with Hydrak fluid coupling and a steering column mounted shifter had been abandoned early on as problematic and difficult to maintain. Hydrak was an early response to the American export market that expected and got automatic transmissions in their higher end car models. This answer to clutchless shifting (1940’s technology by comparison to fully automatic) was transitional and some owners regressed to the more robust standard (fully manual) shift option.
The retrofit parts list would have been extensive and since the conversion occurred almost 50 years ago, I had no idea which parts were used. I assumed that some may have come from a donor car. The clue was the 3 bolt pattern in the shift bearing retaining brackets pictured. Browsing parts manuals of similar vintage models I deduced (correctly) that the shifting linkage was transplanted from the type 190 SL.
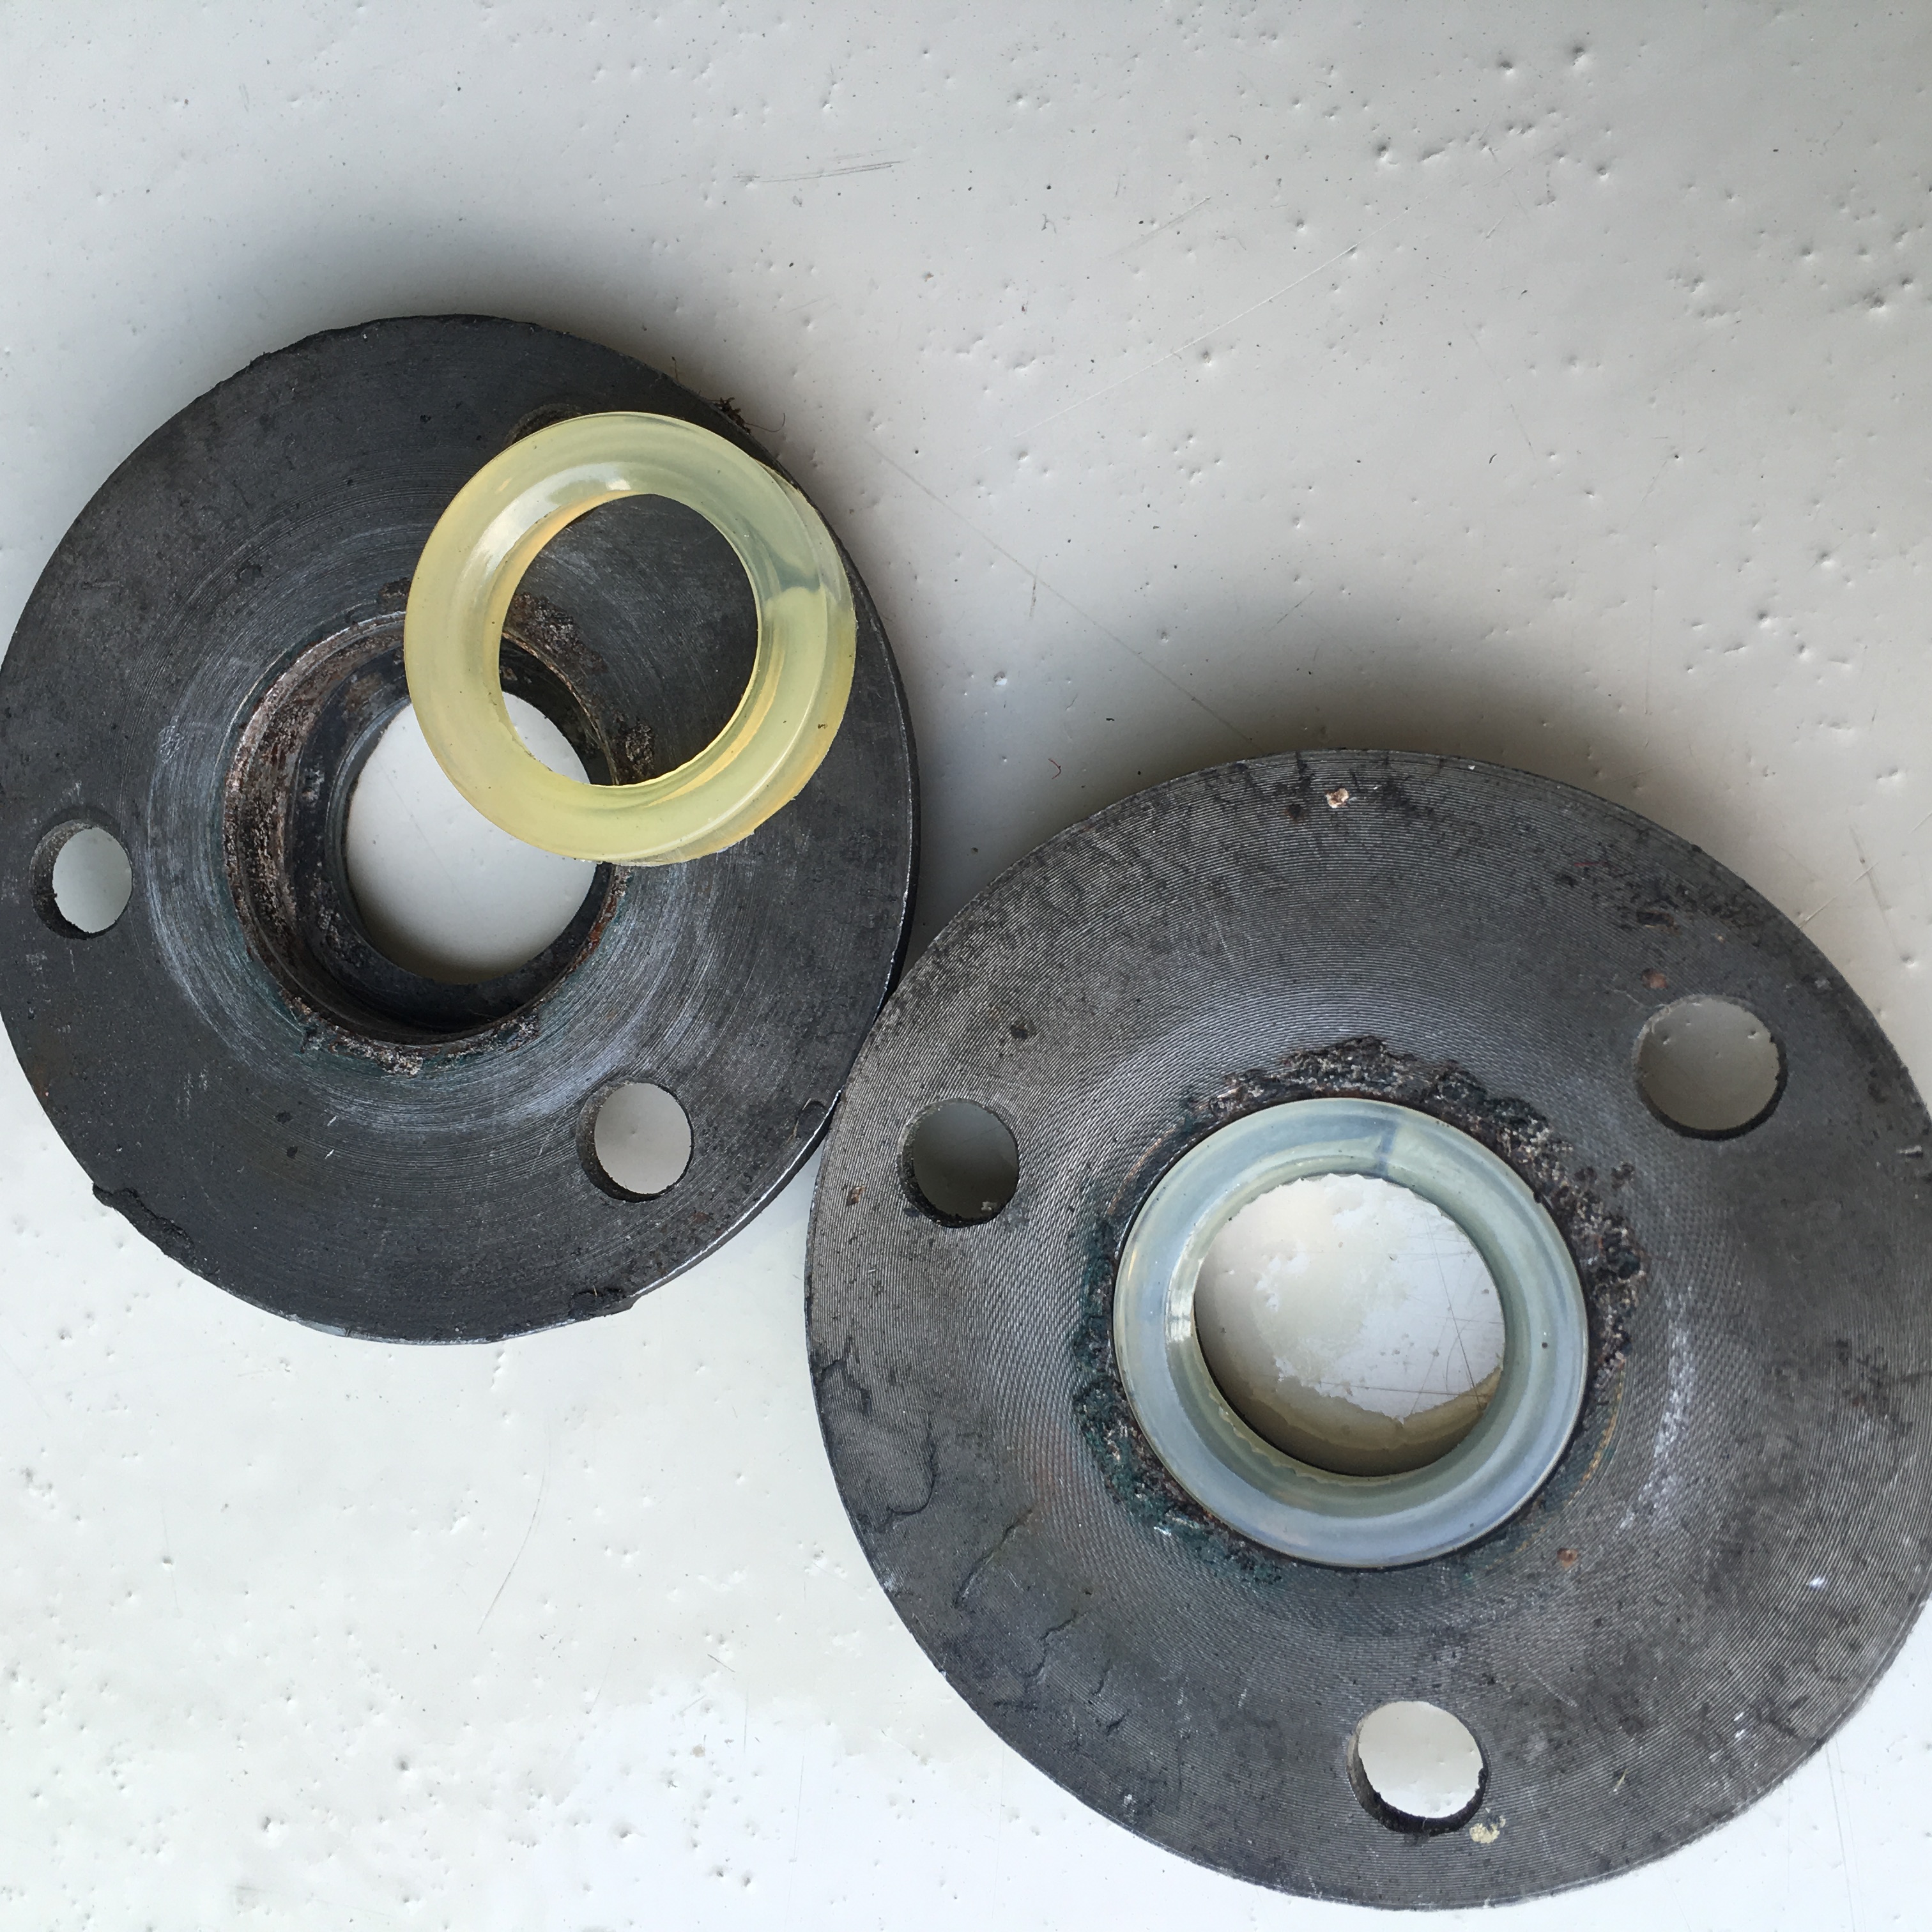
new replacement bushings are nylon
Fig. 26-1/9
the shift lever with bearing surface exposed
The two sandwich halves now firmly grasp the shift lever bearing and driveability is restored.
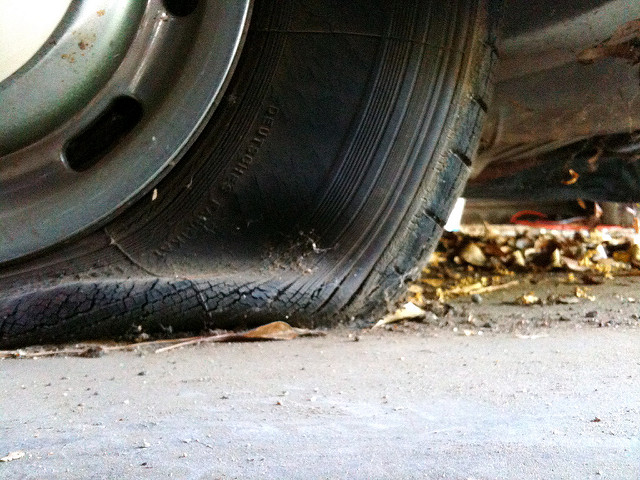
Despite having gone completely flat during many years of storage and with rims pinching sidewall, they took air and still managed to hold inflation.
They last hit the road in 1988 and had been resting on rims, leaves, and dusty cement floor in dry rot neglect.
As you can see the old tires were aged. Visible in the image are sidewall checks and splits. In other areas the tread has separated from the tire casing.
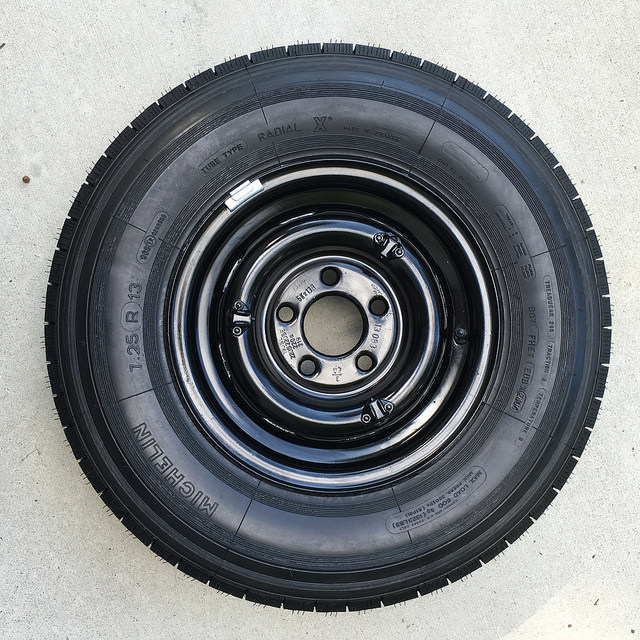
NOS tires were sourced and shipped. The originals delivered with the car as new would have been the optional weißwandbereifung [white-walls] that were in vogue in the USA market during that era. White-walls are exceedingly popular for collectors but I consider them an overly used gussification; (ditto for continental tire kit installations, added rear fender skirts, and dangly things from the inside rearview mirror).
Refinished in correct semi-gloss black
This Michelin “X” tube type radial is period correct and to my taste an authentic european sporting look.
A statement of frustration blurted by my Father when attempting a household repair. I think his meager tool box consisted of pliers, crescent wrench, hammer, pipe wrench and a couple of screwdrivers and bailing wire; so, when the odd DIY task such as connecting the new dishwasher came along his kit was lacking. The lament always signaled impending defeat and preceded the interruptive trip to the hardware store.
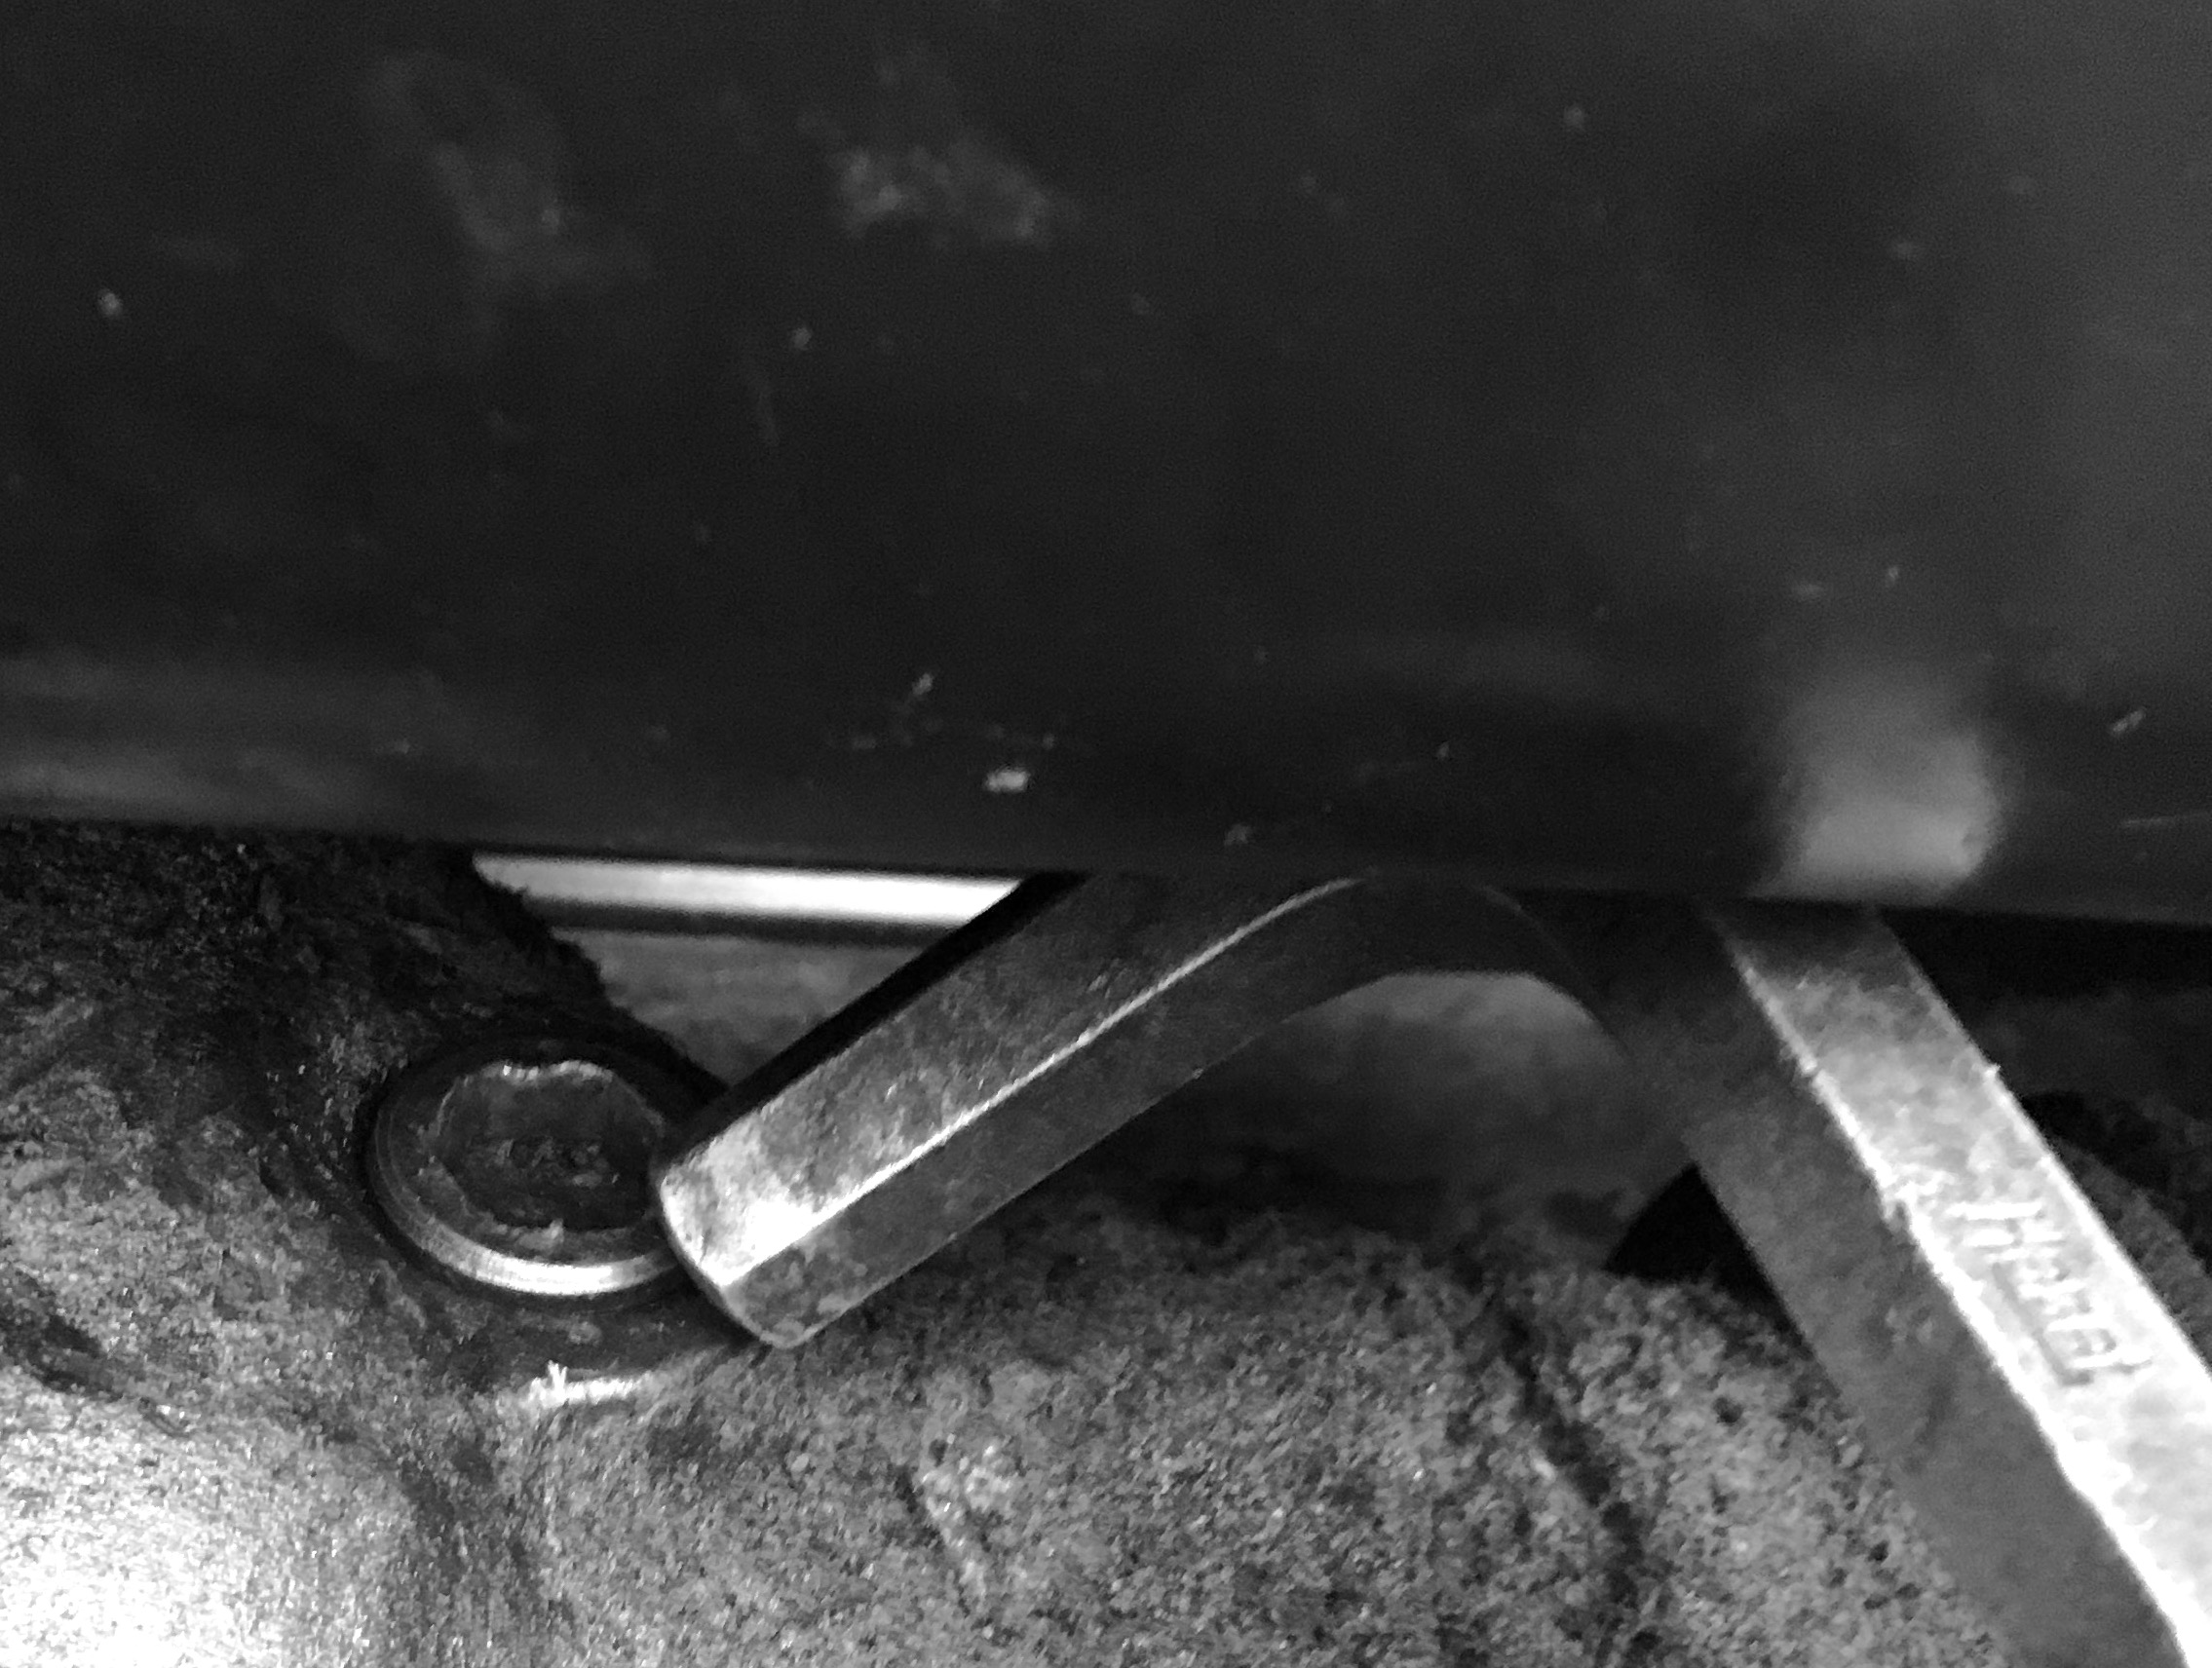
Flash forward. I have a rather massive 14mm Allen Wrench used to remove the hex pattern oil fill/drain plugs on my vintage car. This tool allows me to service fluid level on both the transmission and differential. Almost. It turns out that this trusty wrench is too bulky to access the fill plug on the rear axle. The tool won’t physically fit between the plug and the adjacent gas tank. Consternation follows. What was the method to pull this plug? What tool did I use before and where is it now? Had I ever actually serviced this item? My rolling chest of drawers, while hardly complete, is still a far cry from the random assortment in my Dad’s day. Still, after rummaging through, I realized that I didn’t own the proper tool; a short straight hex key on a 3/8″ socket.
Instead of halting the operation, getting cleaned up, and driving to the Auto Parts House (the proper thing) but in grand gesture toward Dad’s way — I improvised.
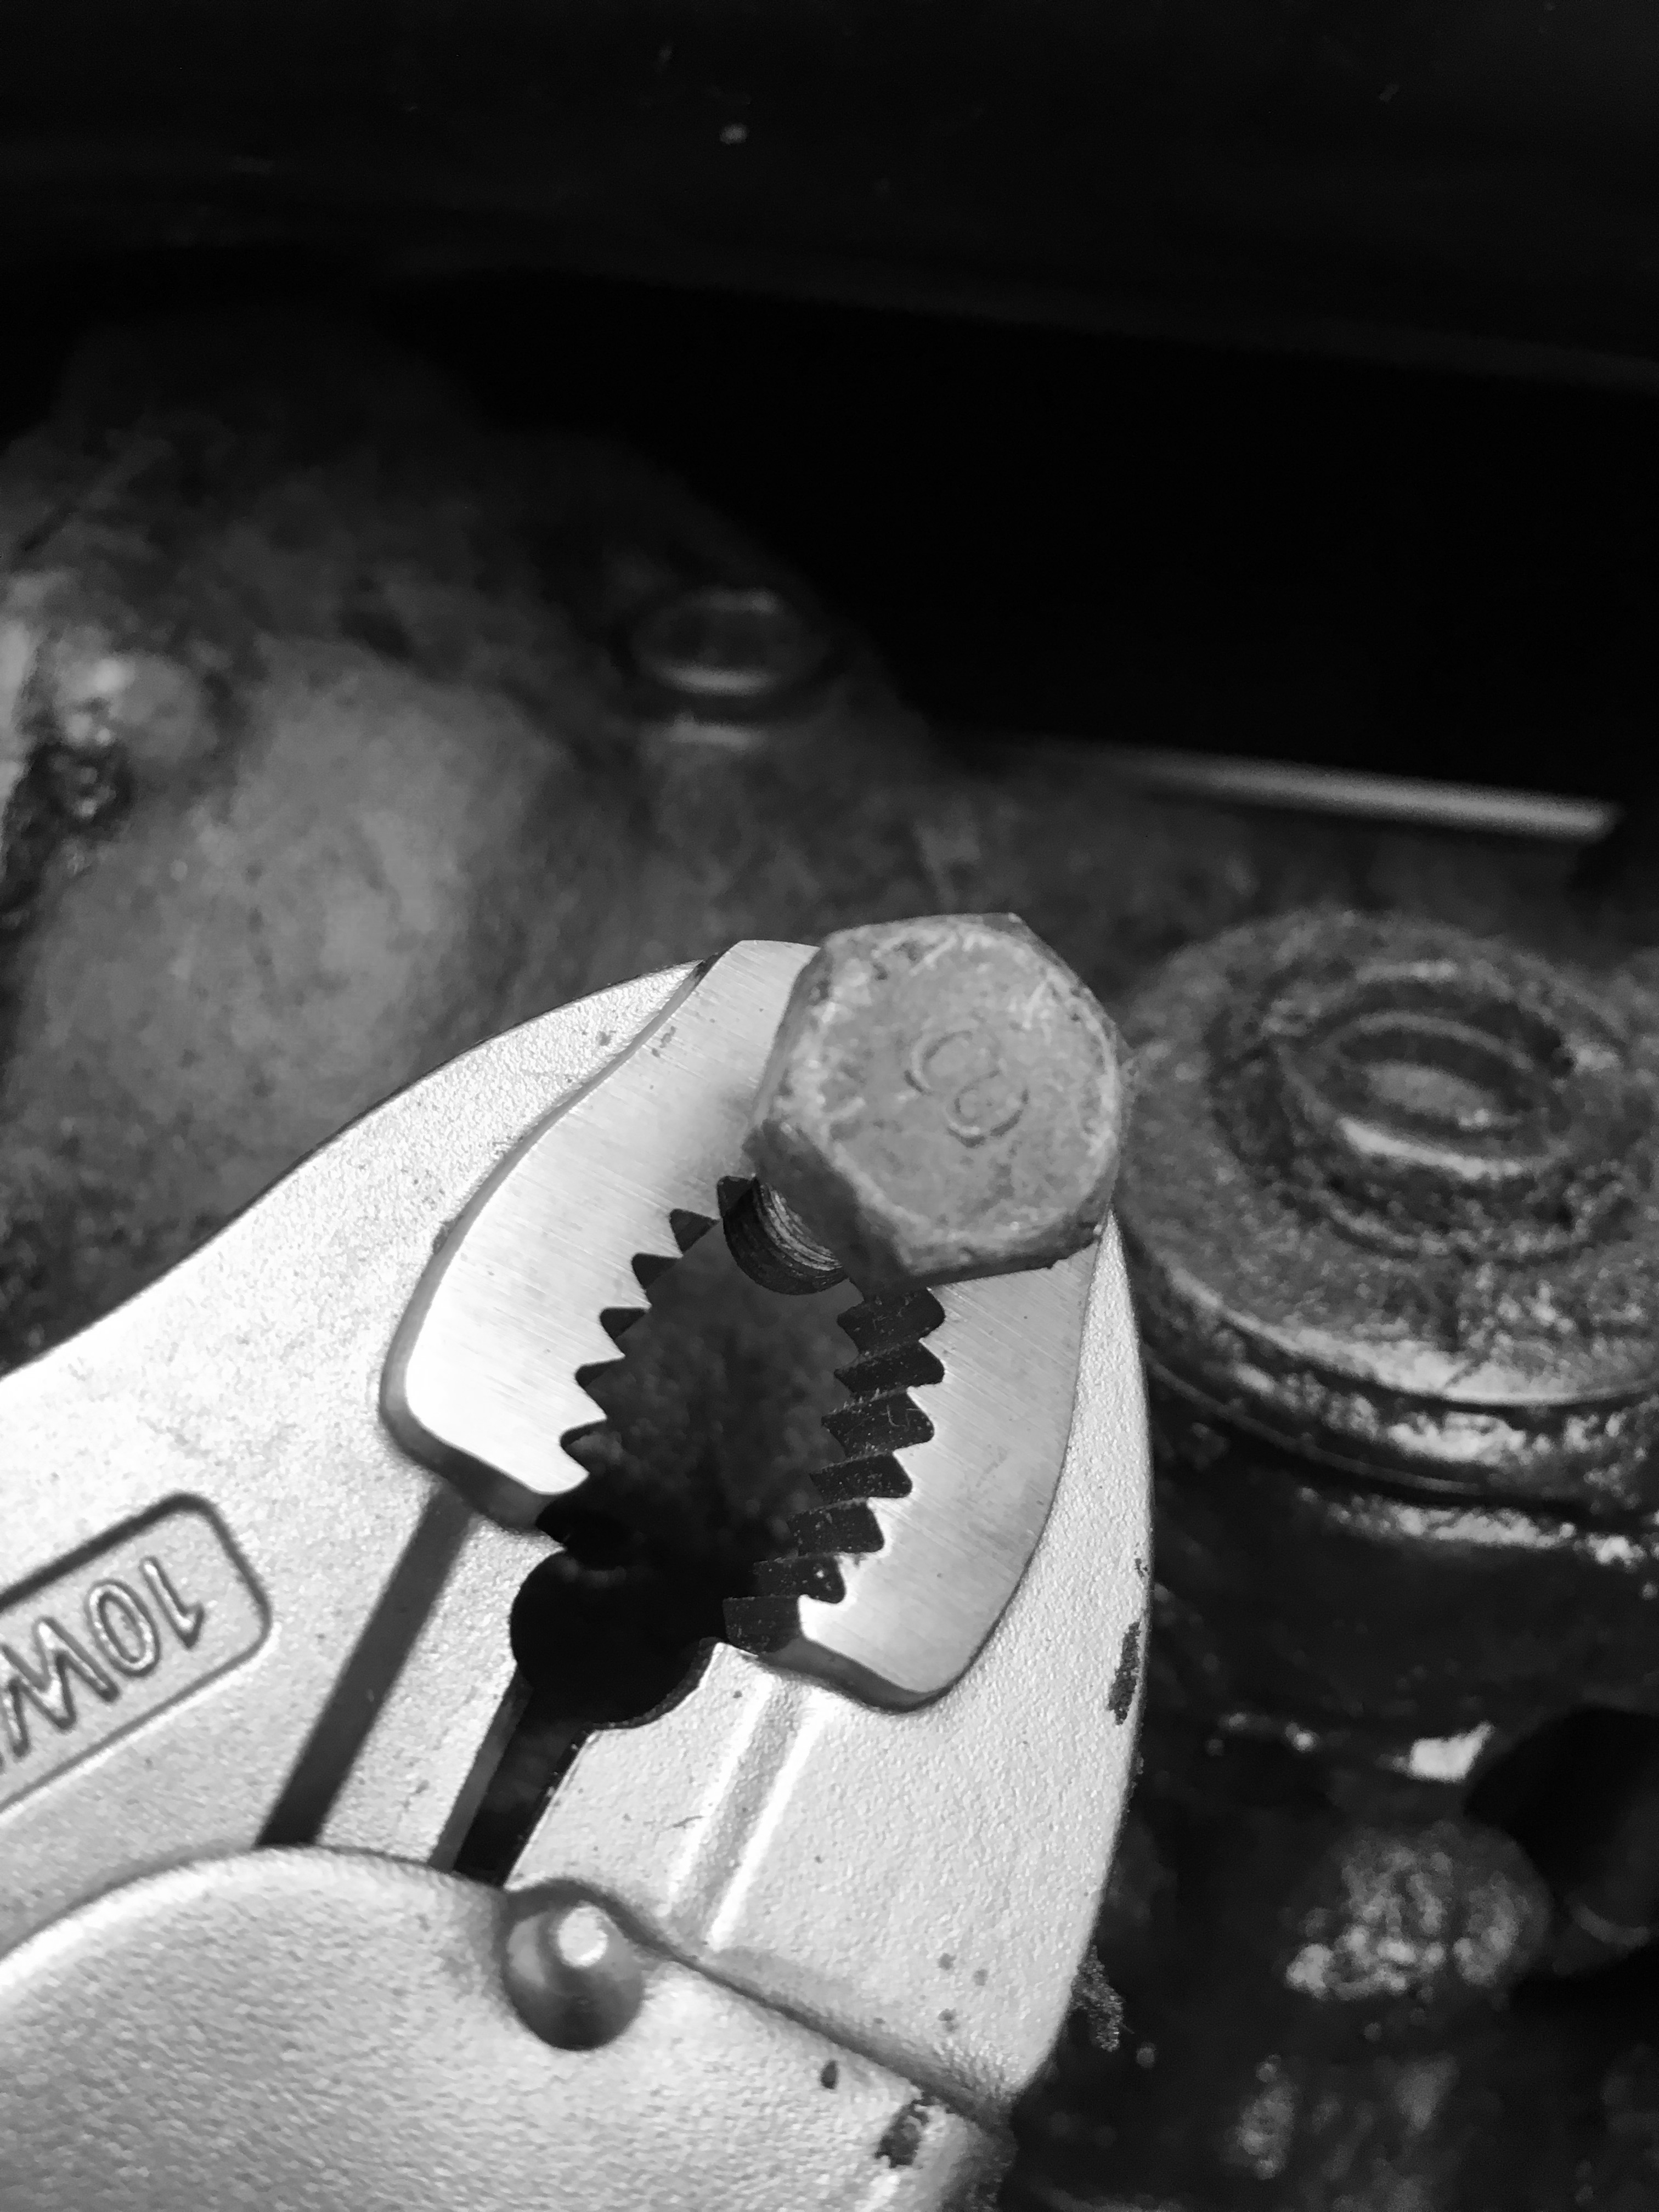
Staring thoughtfully at the internal hex pattern in the plug it occurred to me that a hex head bolt (male) might just be the ticket. 14mm is nearly equivalent to .5″ and my salvaged supply of old bolts might offer a match. I eyeballed a handful of candidates and then began to measure in a more precise way with Calipers. A lag bolt with head measuring .56″ was too great a span, another sample, inadequate. I didn’t want to louse up the female end of the plug. A bolt head that was too small would surely strip it.
An old carriage bolt turned up as suitable and with vice-grips pliers for leverage I was able to cleanly extract the unmanageable plug.
Exasperation avoided and a run to the store annoyance averted, when next surfing Amazon I will order: “The Right Tool”
Dropping the fuel tank reveals a clean area protected from dirt and grime over time and from well meaning painters. The metal surface shows the factory finish — semi-gloss black. Knowing this, I will be able to scrape and sand and restore the undersides in original color.
The fuel sending unit cleaned up nicely. An overnight solvent bath dissolved away the crud and freed the shaft. Unfortunately, the acetone melted the insulator spacers on the terminal posts. I sourced substitutes made of nylon to replace them.
A partial disassembly revealed the innards and some fine wire too delicate to probe further. But it is interesting to see how it operates. I borrowed a multi-meter for an operational check and it appears serviceable. The cork gasket which seals the underside of the sending unit attachment flange to the tank is too far gone to serve as a template so I will trace a pattern on paper. Hopefully all of this will seal properly without seepage or weepage when installed.