Tag Archives: hc38mkII

Sailing a Hans Christian 38 MK II with some high and low adventure.

measure electrical energy and compare

It would be nice to know more about the descriptors of electricity. There are many sources of explanation. What are volts (pressure), amps (flow rate), watts (volumetric measure). Wondering why your iPad charges so slowly on an iPhone charger (1.0 amps) or horrors USB (.5 A) vs the larger iPad power adapter (2.1 A)? There you have it. Amps (A).  Its a given that your house is wired for a nominal 115 v and you car is 12 v. These types of numerical values for volts, amps, and watts in various application are furnished. If one of these three is unknown we can derive it from the other two. It may not be necessary to understand a precise definition but only to realize that they are used to describe the work of energy.  Continue onward.

In general, energy (E) is equivalent to power (P) multiplied by time (t). To determine E in watt-hours (Wh), P must be expressed in watts and t must be expressed in hours. Suppose a 60-W bulb burns for 3 h. Then P = 60 and t = 3, so the energy E in Wh is:

P * t = E using the example values for the variables 60 * 3 = 180 Wh

If P and t are not specified in watts and hours respectively, then they must be converted to those units before determining E in watt-hours. Larger values of P, upwards of 1,000 Wh would be expressed as kilowatt-hour (kWh). i.e. 1,000 Wh is the same as 1 kWh where k signifies 1,000. Fewer zeros that way.

One might be tempted to say 180 watts was the energy consumed but this would be inadequate as it leaves out the time factor. Using the full equation allows you to calculate unit(s) of energy. Take a look at your utility billing and you will see that burning your 60 W bulb for 3 hours resulted in a balance due of $0.0216 Your utility company doesn’t need to know that it was a 60 W light bulb or care that it was two 30 W bulbs or … They just need to know that it was 180 Wh.

How did we get P expressed in Watts in the first place? The light bulb example was straightforward as its P value was printed on the bulb. In some instances a device might have its P listed instead as amps. If we know this amperage value and we also know the value of volts then we can get to watts. Power (P) expressed in watts is equivalent to volts (v) multiplied by amps (A). Suppose a small motor is rated at 5 amps when connected to a 12 volt battery. Then A = 5 and v = 12, so P in watts is:

v * A = P using the example values for the vatiables 12 x 5 = 60 watts

Knowing at least two of the variables means that we can derive the unknown variable. In the above instance we knew v and A. What if we know P expressed in watts and we know v? Yes, we can figure for A:

P / v = A using the example values for the variables  60 / 12 = 5 amps

We’ve discussed E used by light bulb or motor consumers but what about stored energy — like in a battery? We would like to know the storage capacity of a battery. Knowing the available energy, and rate of energy consumption we can solve for t. In real words, if we run that light bulb all night we can calculate how much energy was used or how much will still be available or how much energy we must restore to the battery so that it can be used again the next night.

Battery energy (E) is equivalent to current draw expressed in amps(A) multiplied by time (t). The product is amp-hours (Ah). Then if A = 15 and t = 20 the energy (E) in amp-hours (Ah) is:

A * t = E using the example values 15 * 20 = 300 Ah

This battery supplied 15 A to a consumer for over a period of 20 hours during which 300 Ah was consumed. A typical deep-cycle battery will have a capacity rating expressed in Ah as its performance specification. A battery with E of 300 Ah would be fully discharge (deplete) in the above scenario.

Let’s convert the battery E expressed in Ah to power (P). Recall that volts x amps = P. So if we have a 12 v battery that can flow 300 Ah current we get P in watt-hours:

v * Ah = P using the example values for the variables 12 * 300 = 3.6 kWh

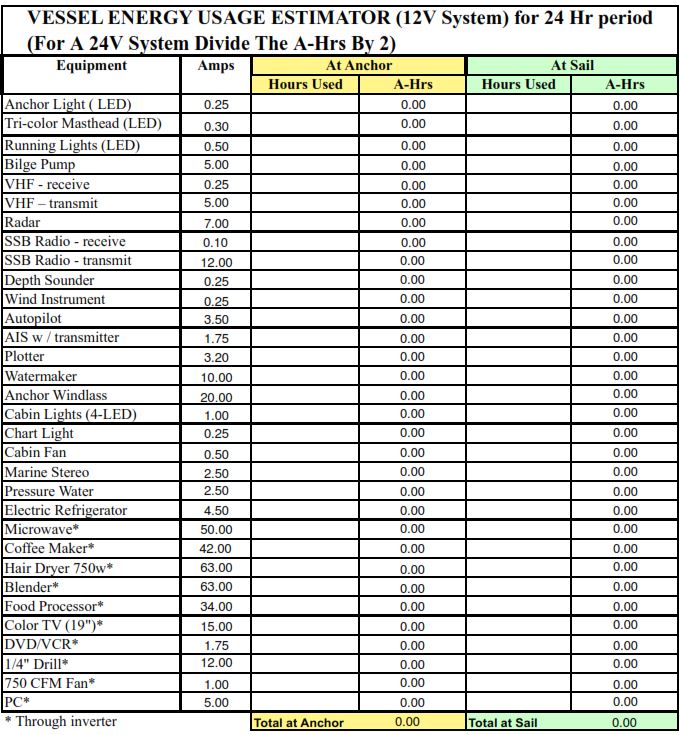
Great. So we have to convert the battery to kWh or convert the consumers to Ah. Let’s stick with the industry standard of capacity measure for batteries — amp-hours. Here’s a spreadsheet that shows a tabulation of various appliance items measured by amp-hours on S/V Talmid :

Sumtotal 1 day [underway] usage [from the Ah columns] requirement for this sailboat is 235 Ah. The battery bank capacity is 300 Ah. From this energy audit we could determine if our battery storage capacity was adequate or inadequate. Also some arithmetic will give an idea of how often, and for how long it will take to recharge the storage battery.

Charging Interval
= (battery bank (Ah) * allowable drawdown (30%) / daily requirement (Ah)) * 24hrs
= (300 * 30% / 161) * 24 = 13 hours

The audit tabulation reveals that sailing all night requires 161 amp-hours. The available energy is 300 amp-hours. Based on those givens the Charging Interval equation shows that after 13 hours we need to replenish the available energy.

Charging Period
= (battery bank (Ah) x allowable drawdown (50%) / alternator output(A) – hourly draw down (Ah)) + charging loss and thus: (300 * 30%)  / (100 – 13.4) * 120% = 1.3 hours

Assuming that the battery is now discharged to 30% the Charging Period equation informs that we need to run the engine with alternator for 1.3 hours.

formula explanation notes:

  • allowable draw down – typically to maximize battery health we don’t fully drain it to 0. Using only 25% of it before a recharge would be ideal. 50% is accepted as a maximum and counts as a cycle. Due to the nature of the material elements and effects of chemistry within  the battery, its life span has a finite number of cycles of perhaps 300 to 600.
  • daily requirement – is the sum of all the operative appliances based on how many hours they were switched on and their consumptive rate.
  • alternator output – 100 A used in the example may be typical but other installations will vary depending on budget or resource.
  • hourly draw down –  is energy point in time that continues to be used by appliances as you are re-charging. It is a deduction from the charging source which now has the double duty of feeding the consumers and the depleted battery.
  • charging loss – an arbitrary value, in this case 20%, which reflects real world inefficiencies. e.g. energy inadvertently converted to heat while converting AC to DC

We could play with the numbers — work the battery a little harder by discharging to 50%. This would allow us to enjoy 22 hours of peaceful serene sailing before firing up the noisy engine to recharge. On the other hand, doing so would require a more lengthy 2 hour recharge because we used more.

Takeaway: Volts times Amps equals Watts. This is all that you need to memorize from this post. Now you can determine the energy needs/cost of a hair dryer. Determine if your lantern will make it through the weekend campout.  A fun exercise might be to figure offsetting the energy consumption with Solar and or Wind. How many solar panels might be needed to relegate our engine generator (or utility company) to a backup role. Energy independence! and the subject of a future post.

She’ll be comin’ round the corner

I’m riding the right hand side of the narrow channel when an ocean tug and potash barge suddenly appear from a blind bend.  I’m comfortably on the right side, in my lane so to speak, so I ready my videocam to try for a cool time-lapse passage. The tug is lashed to the barge stern and pushing. I get s still shot with the camera. We close at rate faster than you’d know and suddenly he’s upon me.  I should have anticipated (but now know) that he’d swing wide in his turn. This caught me off guard and quickly the filming idea was abandoned.

There was experience on the tugboats part. The skipper radically reduced speed, but there was momentum. I dead stopped. All this took a few clock is ticking seconds of analysis/interpretation but it became crystal to me that I was to get out of the way! I made a 90 degree turn to port and crossing his prow scurried on over to the other side of the channel. Safe.

Just barge on through! I reckon he anticipated my moves as he was quite patient; not even laying on his horn — which would have surely caused me to jump-out-of my sea boots. Wish I had the video though 😉

[map]

Look! What the…

Sometimes there is a surprise when the anchor comes up.  Usually you find that the bottom was sandy (clean or grassy) or muddy (unclean). If it’s rocks or coral, then you probably knew that already because holding would have been poor to nil.

A recent overnight stay rest break took place off the Intracoastal Waterway (ICW) outside buoy marker 23. The anchorage has easy access but frequently shares parking with tugs and barges. For this stopover there was plenty of sea-room and I snuggled in.  Raising anchor the next morning seemed routine until the last bit and this is what I saw:

My plow anchor had dredged up what looked like cable and I was aghast thinking it was critical telecommunication infrastructure or electrical utility for the island adjacent. But my chart provided no notes of caution had that been a concern. Sometimes when an anchor fouls it remains planted to the seabed where you can’t see the cause; not without a swim and a free dive for inspection. I’m lucky that the anchor windlass on deck had the muscle power to lift the cable from the bottom of its 10′ depth.  No SCUBA needed.

A close look revealed this cable to be a crusty steel hawser that had gotten away  from a work vessel. Where a recreational boater might use a 1/2″ or less light size/weight rope for securing his craft, this one was industrial gauge; at least an inch or so in diameter and very heavy duty. In fact, due to the angle of the anchor plow, the beast was well caught up. I tried backing down to see if it would just flip off but I couldn’t shake it. I thought maybe a neighboring work crew that was busy getting a barge ready might have tools, skills, or desire to take claim. I decided to solve this one on my own.

If I had a do-over, I would have tied a length of rope to the cable and the bitter end to my bowsprit platform.  Simply lowering the anchor chain at that point would have freed my anchor. What I ended up doing was raising the anchor until the plow edge went horizontal. With a flat surface I figured I could just slide the cable off. But bare hands still couldn’t budge. I went aft to find my boat hook pole to gain leverage. With not too much heave-ho the cable slid aft toward the anchor tip. The distance to freedom wasn’t far but each inch required some grunt on my part. As the bulky cable was finessed off it immediately plunged back down to the dark depths. Unfortunately, and I realized in an instant too late what was to happen next and what the outcome would be, because — the boat hook was still hooked! The heavy cable was about to claim it and my arm too had I not made the correct choice and released my grip.

King Neptune has his cable back — and my boat hook as well.

Energy Phase One

Phase 1 was a re-fit. The original [35 amp] Hitachi was removed and replaced with a new alternator of higher output. The Hitachi was intended to maintain an engine start battery. However, it was ill suited  to restore charge of a large capacity house battery bank and could barely cope. The new 100 amp unit will be a big improvement.

In order to do a proper job the original 3/8″ V belt was changed to a 10 rib Poly Micro V belt (aka serpentine) with pulleys. This was not easily accomplished. The Yanmar 3QM30 diesel is an ancient (but solid) lump of iron that was manufactured between 1976-1980. They aren’t that common these days and it’s a challenge to find parts. As such, it was hard to locate a belt drive conversion.  I searched and made inquiries and finally found encouragement from a lone blog post from a  trailblazer who appeared to have success.

the Before (note the belt dust!) and the After…

With the higher output, new temperature sensors on both the alternator body and battery itself were added. These talk to an advanced charging controller (fka a generator regulator) to insure long life for all components. The Hitachi had an internal regulator that output 14v regardless. This was fine for old tech lead-acid batteries but state of the art batteries are AGM and they need special feeding utilizing a 3 step charge algorithm.

Smooth running and no more belt dust and shredding failures. Over-tensioning the old V-belt would have helped to cut the slippage but doing so would overstress the water pump bearing and did I mention that parts are hard to find? There is only one guy I know of that can/will rebuild a 3QM30 fresh water pump so handle with care.

Phase 2 – Solar Energy!

Electrical Diagraming

The electrical system onboard Talmid, while well executed and adequate by OEM standards, could benefit from a re-fit. Modern comfort necessities and new equipment rely on a robust electrical system not foreseen back in the day. Battery chemistry has improved but that comes with stricter charging care and feeding requirements.  There are improved energy source options in both solar and wind.

Follows is a schematic and narrative for what I have in mind for the boat. Central is the Battery system which is comprised of the House Bank (Battery #1) and an Engine Starting Battery (#2).

The original system is wholly dependent on the engine driven alternator to restore a discharged House Bank. Proper seamanship dictates that the Starting Battery always be reserved for engine starts for which this need should be obvious.  Switching allows the selection of Engine Battery or House Battery or Both (together in parallel) or OFF. This is good flexibility but when you crank the starter motor there is huge voltage sag. This results in lights dimming, the GPS signal being lost, and the Navigation Course Plotter resets. Sometimes it kicks off the Auto Steering too. Surges and spikes aren’t good for electronics. This happens because all consumers are tied to the same battery. The switching can only direct to the source.

This new design above allows for three battery switch choices: ON, OFF, and Manual Combine. Combine (aka Both) is for an unusual situation only (e.g. a battery bank has gone flat) and the normal operational selection is: ON. Each battery system is split. Thus, if the engine is started, the other consumers can continue to chug away without interference. Split batteries are good practice because if there is a heavy discharge, or a short circuit or failure loss on one battery side then the other battery side is not likely to be affected.

This new design will require battery charging leads to one battery system or the other in order to maintain the desired isolation. However, there is a way to maintain a proper charge state on both battery banks through the use of an Automatic Charging Relay (ACR). This hardware, through a one way only (diode protected) connection permits charge voltage to pass to both batteries. When the ACR senses discharge the connection between the two banks is opened. The schedule is programed to work with system voltage as follows when:

  • Voltage > 13.6v combine after 30sec.
  • Voltage > 13.0v combine after 90 sec.
  • Voltage < 12.75v open after 30 sec.
  • Voltage < 12.35v open after 10 sec.

There is some overhead for the ACR. It has a small energy draw.  Also, there is a fallibility with voltage sensing relays to do with  combining and isolation cycling. To mitigate the possibility, the charge energy sources are defaulted to the (house) battery bank that is likely to experience the most discharge. Further, when adding complexity to a system you have to assume it to be a point of failure.

a solid base

In removing the original Hitachi I noted the mounting saddle  and associated bolts lacking the standard Yanmar grey but coated instead with rusty corrosion. Wanting to dress things a bit in anticipation of the new alternator upgrade,  the mount will be cleaned and Rust-Oleum applied. Further, after having read of other people’s woes specific to alternator bracket failure, I want to inspect for cracks or metal fatigue.  For sure the bolts will be exchanged as a precaution. Witness this sad bolt in particular which suffered thread galling. I suspect that It is an SAE thread that wasn’t meant for the Metric hole tap or vice versa. I shall visit the parts bin and compare to find out more; but in either case the receiving threads in the engine block will need re-doing.


It’s in the small details

Conserving energy is a way to help cut carbon emissions and save money but on a boat it takes on an overriding importance; and that is because energy is finite. You are either bringing it with you, stored in the form of Diesel Fuel to be converted, or harvesting energy from the Sun and Wind as you may.

Alternative Energy will be pursued but at this moment part of the big picture is to reduce reliance upon it by not wasting. Observe that the boat has a dozen or more light bulb consumers. These are 12v single filament bayonet mount style which are relatively cheap and serve well but at they are hungry. The old school bulb on the left squanders 15 watts. The new solution pictured right is an LED using only 1.5 watts for an equivalent light output.  There are even red LEDs (vision preserving for night ops) and .8 watts with reduced lumens.

More minutia: It only took the better part of a day to properly source this retro-fit. There are quite a few styles, sizes, and types from which to select. The Sea Dog dome lights utilize a double contact base for + and – not to be confused with the automotive setup which uses the base itself for a negative ground and the double contacts for dual filaments. The challenge was to procure a globe that fit the lense fixture and a socket that fit into the ba15d base as designed.

It all adds up, but this small effort will reduce the need for additional capacity. I suppose this brass wick oil lamp might be the outstanding supreme fix.


Belt dust and shredded rubber

The simple engine driven charging system onboard Talmid was designed to serve a lead acid starting battery. With rated output of 12v and 30 AMPS, and as the sole source of energy, the Hitachi alternator is also called upon to recharge a 300 Ah capacity house battery bank. When the house bank is depleted, discharged after a day under sail for example, the little alternator is overtaxed which manifests in long charging times and a heavy strain load on its 3/8″ drive belt.  Spares are carried because at some point the belt will inevitably perish, possibly at a critical! moment. Monitoring its condition and becoming  mechanically adept at adjusting proper tension is crucial. Belt tensioning is achieved via adjustment bolts on the alternator mounting brackets. All other pulleys are fixed in their positions. Measuring belt slack while flexing the belt with a finger means the procedure is rather subjective. Too loose results in slippage which translates to premature wear. Adjusted too tightly and the added stresses will accelerate [water pump] bearing wear. The image shows the original belt drive system on the old Yanmar 3QM30. It is driven by a 6″ crankshaft pulley [lower]. The pulley for the water pump cooling system [upper] and the alternator completes the triangle.

There must be a better way. Indeed. On order is a higher output 100 AMP alternator, which is better sized to match existing battery capacity. Even more load for the feeble V belt you say? No. Central to this upgrade is a new serpentine  drive belt system. Serpentine is a descriptor derived from modern automotive application as the belt snakes to and from numerous driven accessories in one continuous loop. This is a simplification from early days when an engine had several belts. A serpentine belt has ribs and grooves that track precisely in machined pulleys and significantly increased width will enhance grip surface area.

Another modification, to complete this installation, will be the addition of an updated voltage regulator. The original Hitachi has an internal regulator which supplies a constant output of approximately 14volts. This is suitable for lead acid batteries but harmful to Absorbent Glass Mat batteries over the long term. AGM batteries require extra care and feeding in order to insure longevity. A 3 step charge algorithm calls for 14 v during the bulk charging phase but also includes an absorption and float stage. These included stages scale back the voltage and allow the AGM to be restored to full capacity. Long life preserved.

This is the first step toward a robust energy system because as the sole source, it is a single failure point. Alternative energy will provide redundancy. Available and useful are Wind and or Solar. In any event, I believe that outfitting with the new alternator scheme will go along way toward solving previous weakness while eliminating the belt dust nuisance and shredded rubber breakdown.

leave less to chance

What can go wrong WILL go wrong. sorry keyI only had the one key and it was really looking past it. Not visible by thumbnail image is a hairline crack across the blade; a victim of too many bendings from body bumps and slams (the engine control panel and ignition switch is located in the companionway and the key protrudes) It might eventually break off (in the switch!) or go missing. Either way, SOL.new switch

I took the original to a locksmith or two to see about cutting a new one. Out of the zillion types onhand, none could procure a suitable blank. Yanmar no longer provides for replacement keys. Solution: Order the entire switch. Comes with an extra to boot.

Countryside Discovery

I really expected to be chasing down this repair job from vendor to vendor trying to track down the right outfit for the job. I got lucky and scored first try.  I knew that I was ill equipped tool wise and vague on metallurgy. My Sheet Block, built back in the day, sheet blockwas non-replaceable.  The fixture was warped; bent by the powerful loading of the jib sheet when a pivot pin partially backed out.  A massive bench vice or a hammer, or a heating torch or all of the above would be needed. Finding a metal fabricator with a Google search led me, not to an enterprise in a business park, but a guy named Johnny at a leanto shed in a rural setting on a dirt road.  He went right to work (how rare is that? but halfway through the job I realized that my credit card would be of no use out here and I began to search pockets to see if they had Cash!).

hammer persuasion

Johnny persuaded the heavy piece back into shape and the pin was straightened with several strategic blows and aligned.

Next, Silver Solder was applied to hold the pin in place. If this proves an area of weakness, I may peen the housing bracket or secure the pin with a set screw. Turns out that the entire mass of metal is cast Brass with a Copper plated finish. This explains the malleability and the  blue green oxidation. Old school. I don’t think they make ’em like this any more.

I mentally noted a placard sign affixed to the wall that proclaimed the shop rate at $65/hr. with a minimum job amount of 30. I had all of 26 dollars in 3 Fives and the rest Ones. Uh oh…  I asked what I owed. A delayed response gave pause and I interjected that I had only 26 bucks on me. Johnny said I’ll take 25 of those.

https://youtu.be/zZKvTingf1Y